About the project
My team developed a one-stop app to store and manage projects and their relevant information for project team leaders. Team leaders refers to those who are in charge of planning an event such as concert, sports event and software engineering project. We realise that many students in NUS are involved in such events but all of them face some common problems. These problems range from arranging a meeting, keeping track of the finance information and delegating tasks. Thus, we have MyProject as the solution.
MyProject has a few distinctive features to help them out which includes:
-
An address book to record contact details of the planning committee members
-
Generating common free slot among members for meeting
-
Keeping track of budgets information
-
Updating the members with regards to the project via email
-
Monitoring members' performance in terms of attendance and amount of tasks done
Summary of contribution
Overview
What I did for the project is generating ideas and implementing change in UI display feature as well as finance tracker feature.
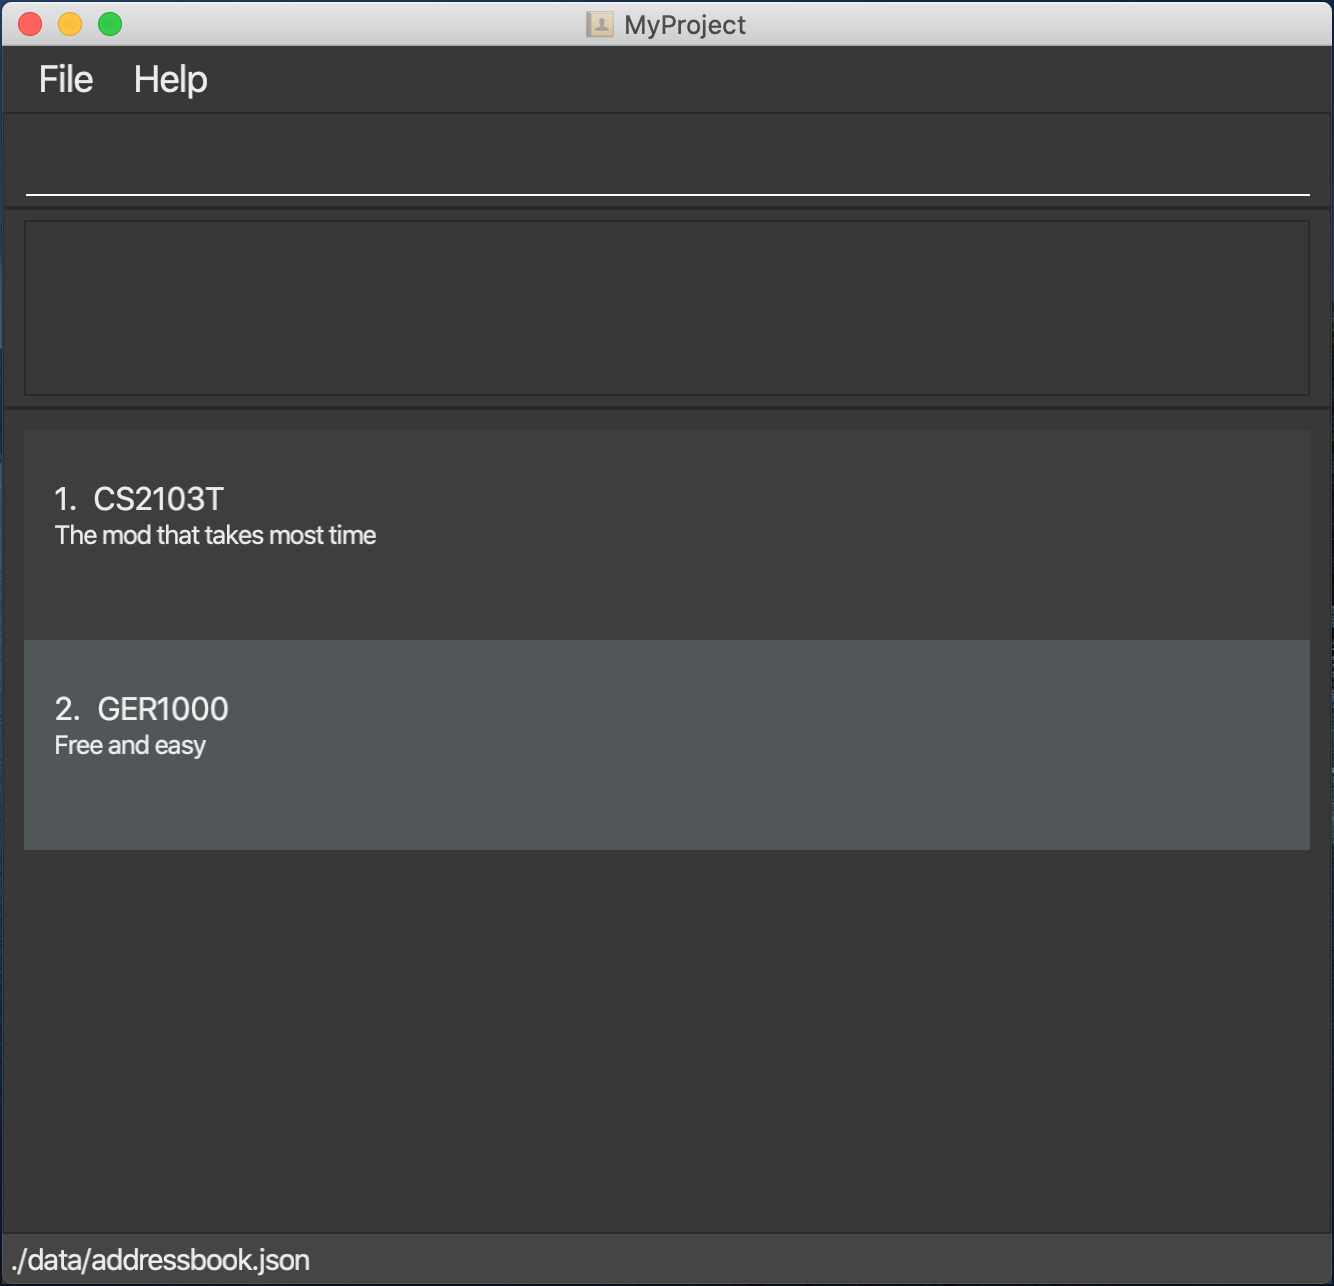
At the apps home page, a list of projects that the user is currently involved in will be shown. If the user wish to work on a particular project, simple checkout to that project with the command checkout followed by the index of the project.
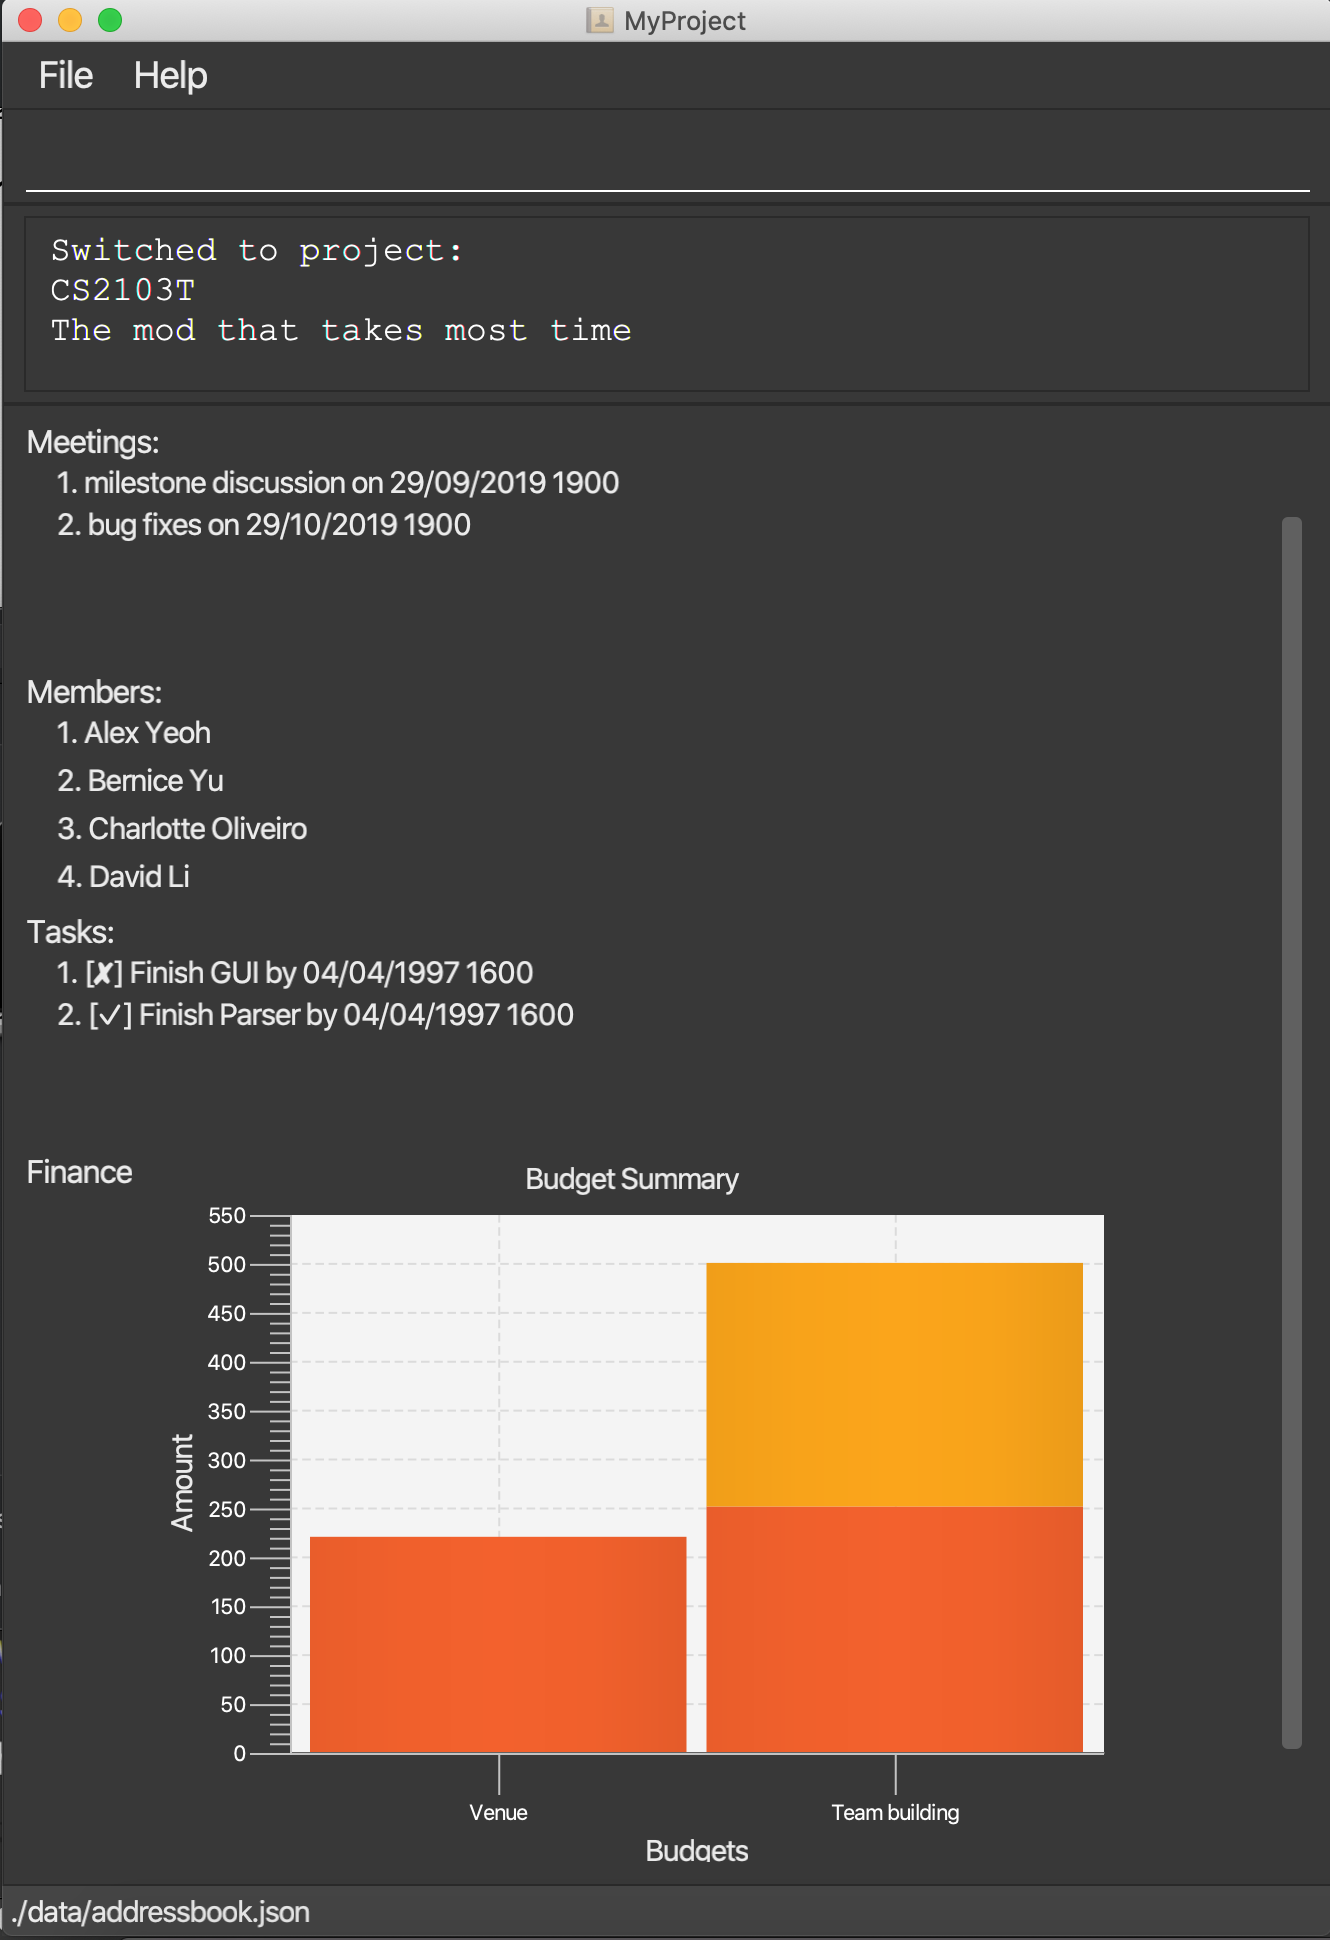
After checking out, a project overview will be shown which contains the important information about the project. Below is how a typical project overview look like.
Code contributed:
Please click the link to see a sample of my code: [Functional code]
Features added: Finance tracker.
-
What it does: It allows user to monitor the budget situation for a project. For example the umbrella organization of a cca set the budgets for an event which includes equipment with an amount of 1000 dollars. The user can add this Budget to the project. When an expense is made under this budget, let’s say 200 dollars are used to rent fog machines for the event which can be claimed under equipment budget. The user can add this expense under the equipment Budget. MyProject will minus away this amount from the budget and calculate the remaining amount. At any time, the user can view a detailed summary of the budgets in a pie-chart format indicating all the expenses under a budget and an overview of how much are left for each budget in the project overview. A even more convenient function is that it generates an excel sheet that corresponds to the budgets data. It can be used for sending out to the rest of the planning committee members to update them.
-
Rationale: In many projects, finance information is only restricted to the treasurer but it is actually important for members in the planning committee to know about it. For example, the publicity in charge may reconsider the props he’s going to use after viewing the budget situation. Thus, monitoring the budgets information is essential for the team leader to know the situation and to update the members if needed.
-
Highlights: As a beginner of JavaFX, understanding the concept of how UI works was challenging especially given a rather advanced set up. The implementation of the budget is actually a finance object containing a list of budgets objects which each contains a list of spending objects. This implementation requires a lot of interaction with jackson which is also a challenge. Lastly, playing with Apache POI was really fun. I get to create and style excel sheets and learn about using other’s API along the way.
Features added: Change of Ui/checkout feature
-
What it does: Allows the user to switch to a project to work on it. As the user types a command, the display of the application will change to a state that best fits what the user would want to see after typing that command.
-
Rational: Users would expect to see different information given different commands. If he adds an expense, he may want to see information with regards to finance thus displaying the list of budgets maybe more suitable than displaying the project overview.
-
Highlights: The logic and maintaining design pattern is the hard part for this as different commands needs different interfaces and the switching between interface that involves switching to and from the current working project.
Other contribution:
-
Idea generation: The idea of the project stemmed from my personal experience and as a team we together make it a success.
-
Helping out team mates: During the process, I helped some team members to brainstorm certain part of their features such as email.
-
Reviewing of PRs: Made some constructive feedback on 2 of my teammates' PR.
-
Building the foundation of the app: As we are building a whole new model, I volunteered to construct the basis of the app which is the project model. It has the ability that is similar to address book.
Contribution to User Guide
Since I’m in charge of the finance feature I’m demonstrating how I document this portion in UG.
Finance
Imagine today you just attended the Budget meeting and your Organization is kind enough to provide you with budgets for your event! How delightful! What’s better is that you can record this information in MyProject!
Add budget: addBudget [Checkout]
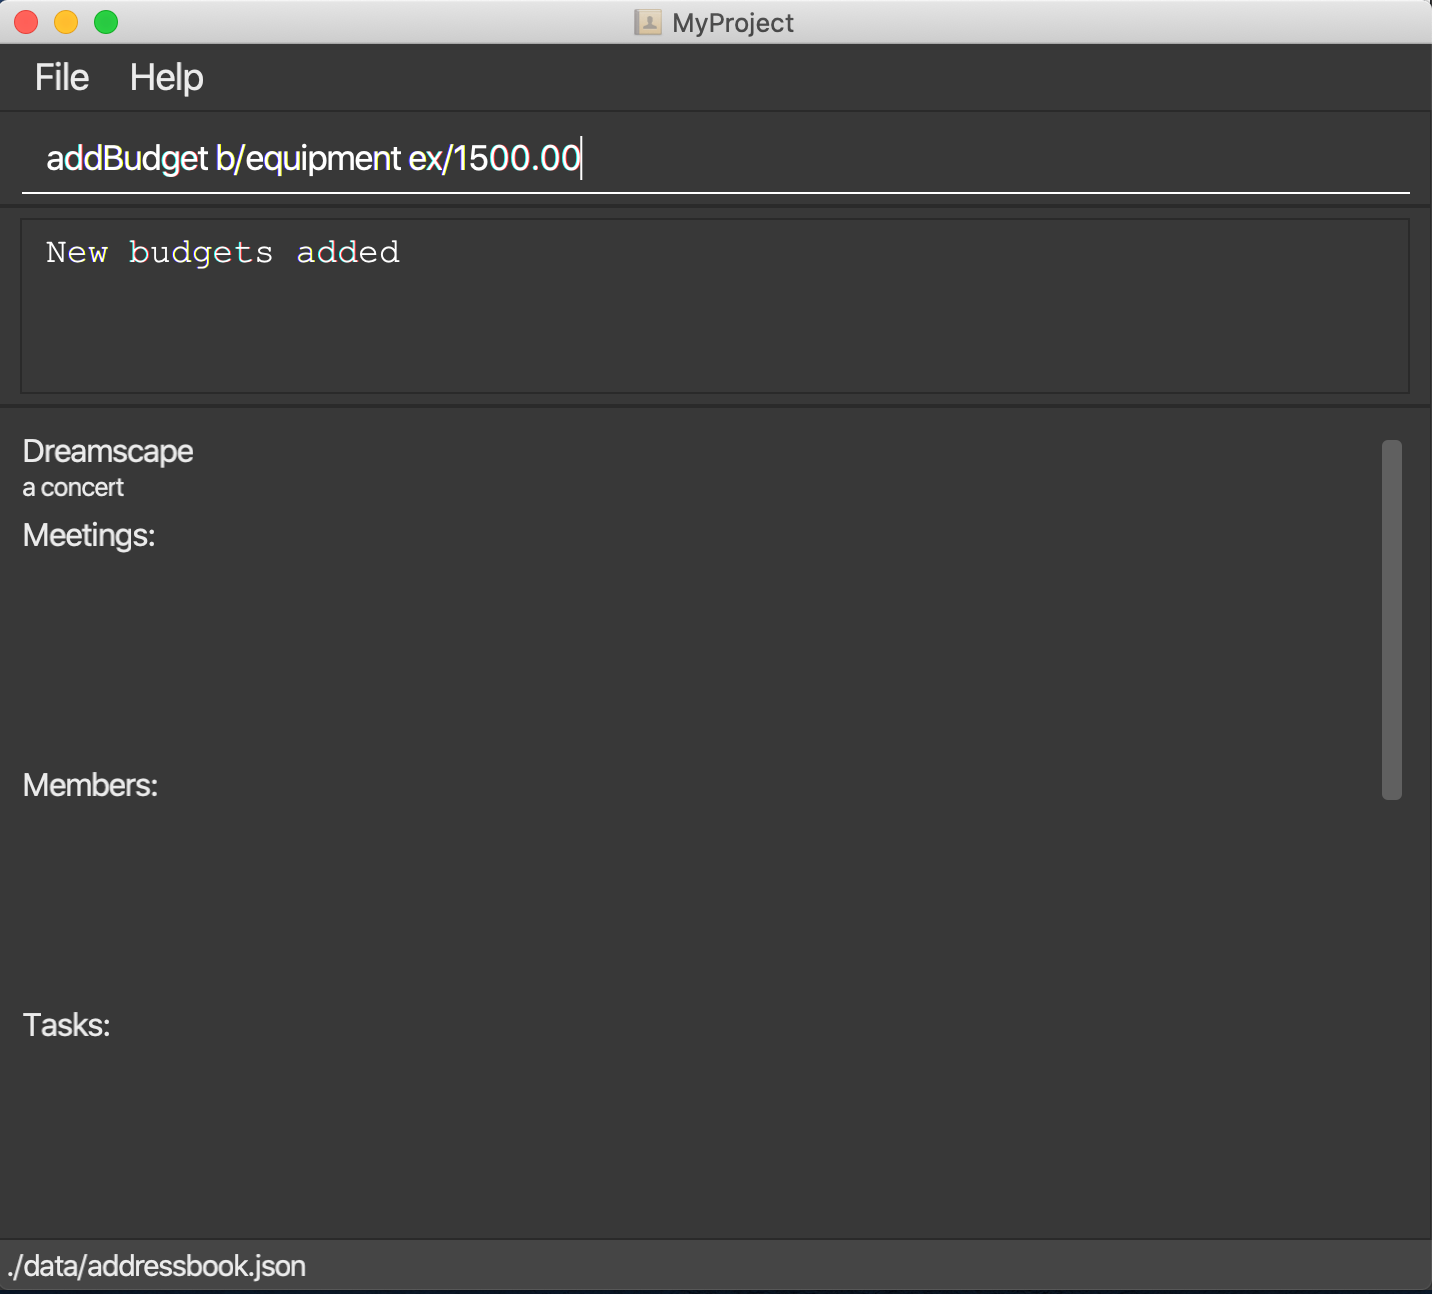
Let’s say the organization gave you budgets on equipment and manpower, let’s first add these budgets to the project.
Format: addBudget [b/NAME_OF_BUDGET ex/AMOUNT_OF_BUDGET]
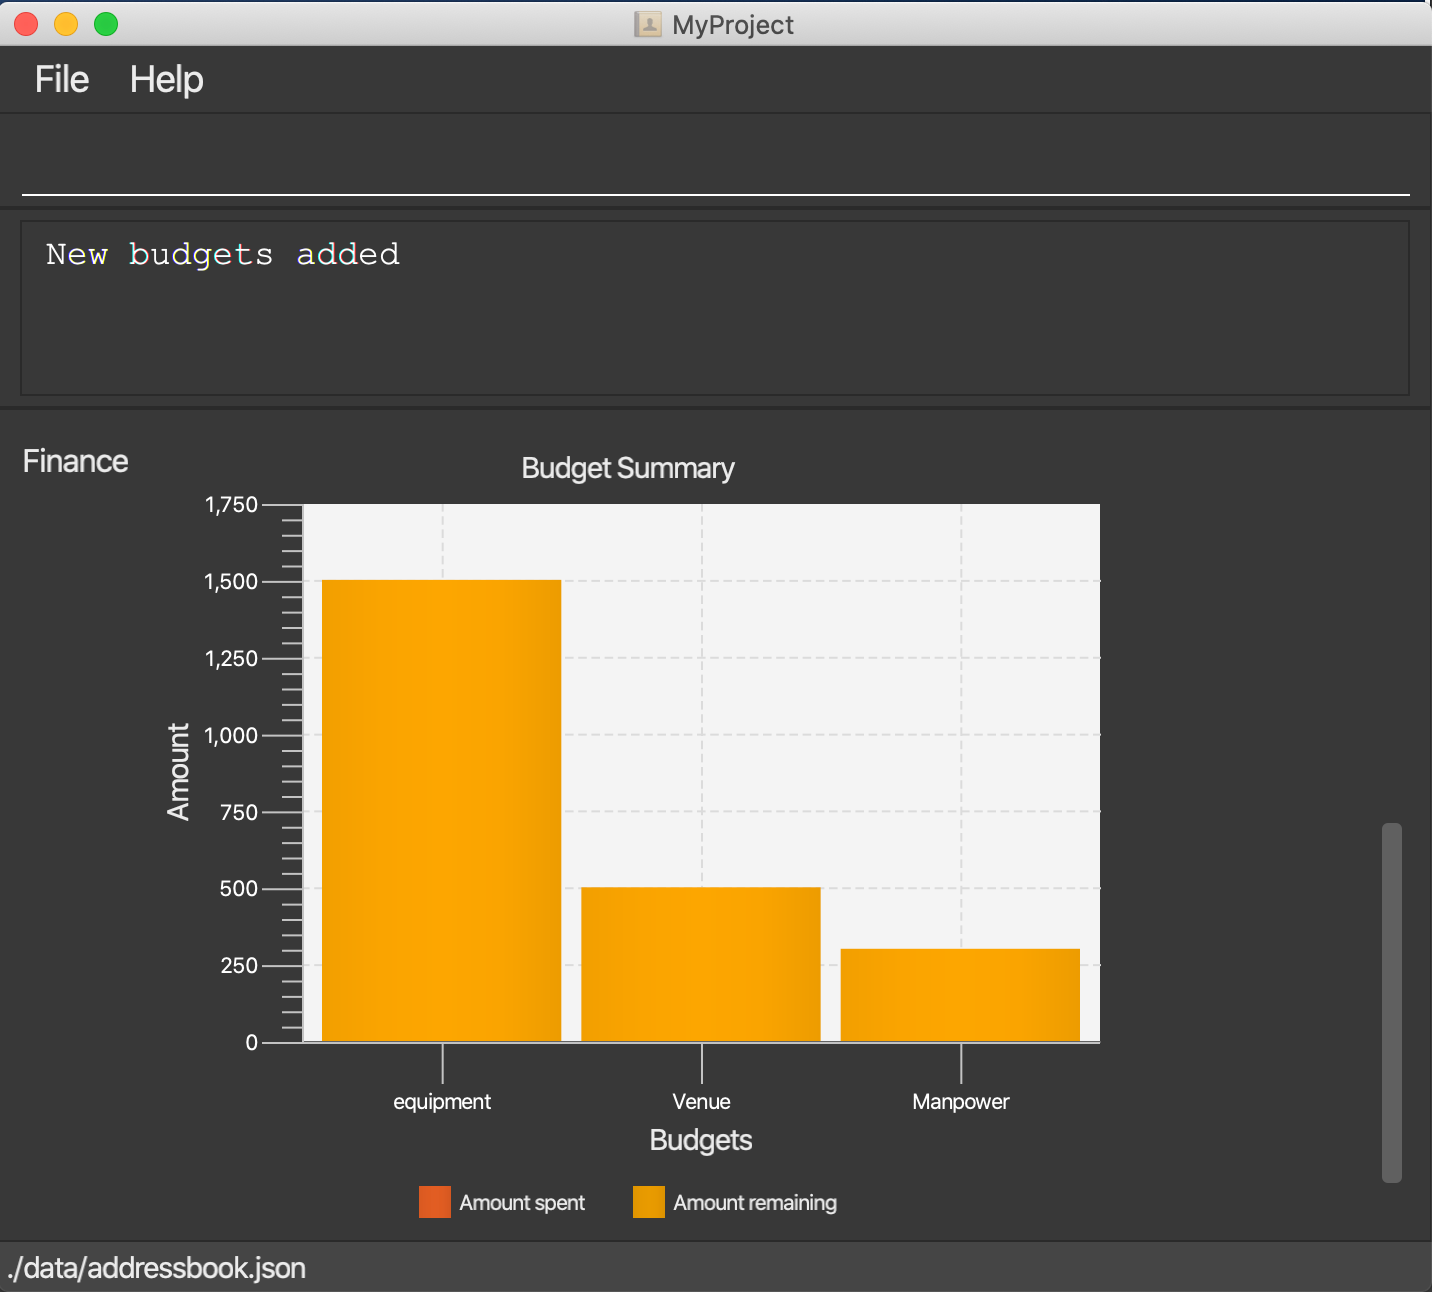
After adding the budgets, we will be able to see a summary of them at project overview. Currently it only shows the amount remaining which is the same as the amount you typed just now because you haven’t spent anything yet.
Add expense: addExpense [Checkout]
Format: addExpense [INDEX_OF_BUDGET] [s/DESCRIPTION] [ex/AMOUNT SPEND] [c/dd/MM/yyyy HHmm]
One month later…
Now you have gone through quite a few meetings with the planning committee and made some orders online and receive some invoices, what’s next? To record all these expenses, simply use the command addExpense to add it under the budget. In order to do that, you need the index of the budgets which you may already forgot, but you may simply type listBudgets to view them again.
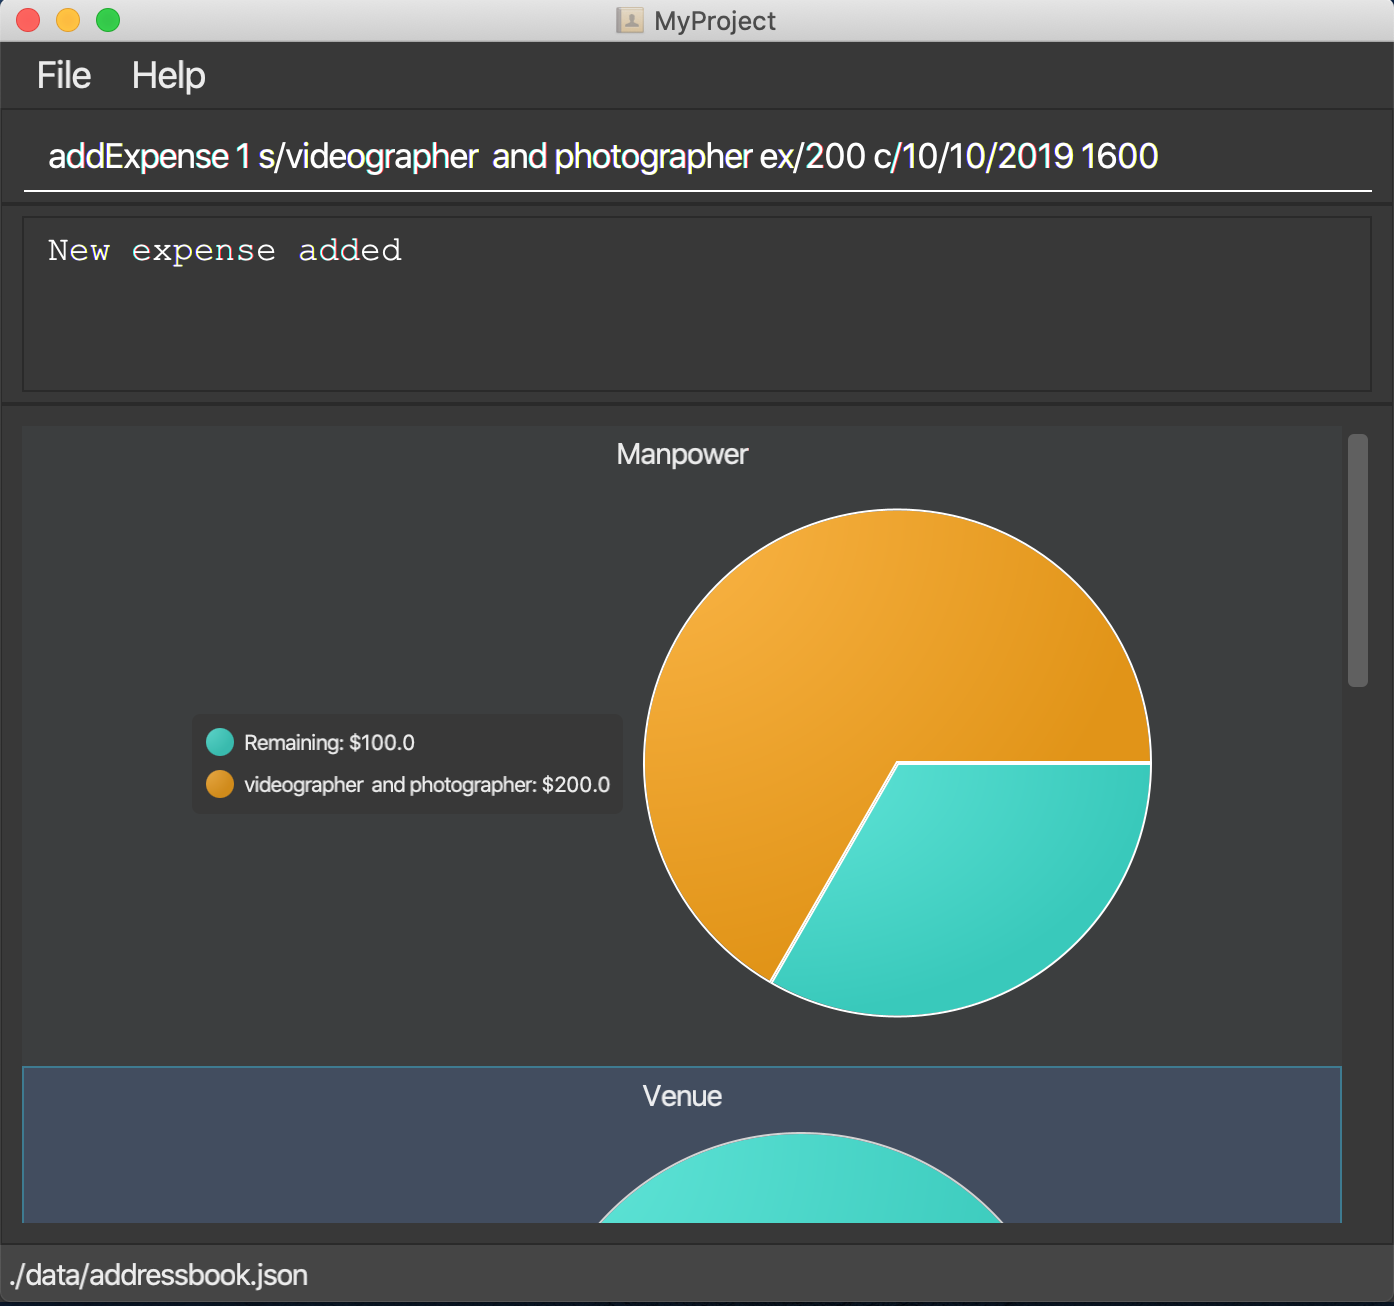
List budgets: listBudget [Checkout]
List information about the budgets.
Format: listBudget
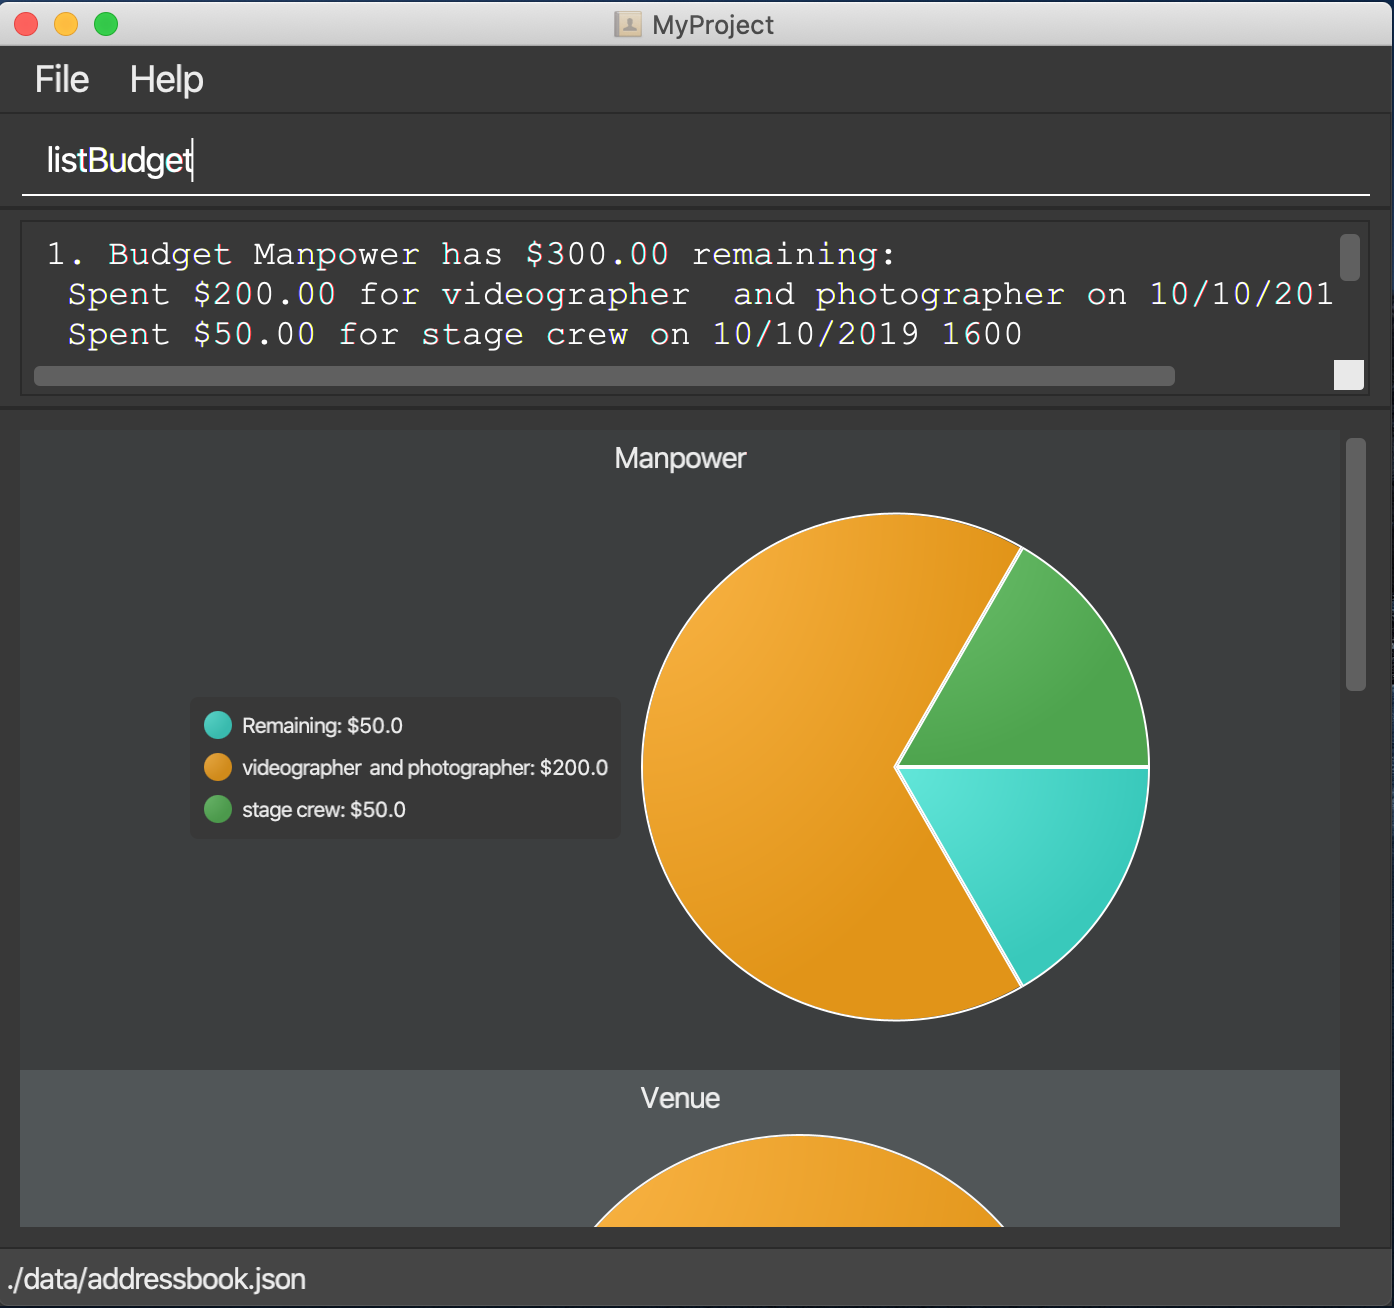
In the diagram below, you are seeing the pie chart representation of the budgets. It will usually show all the expenses made and the amount remaining for this budget. However, if you have already overshot the budget, the pie chart will show overshot instead of remaining to remind you!
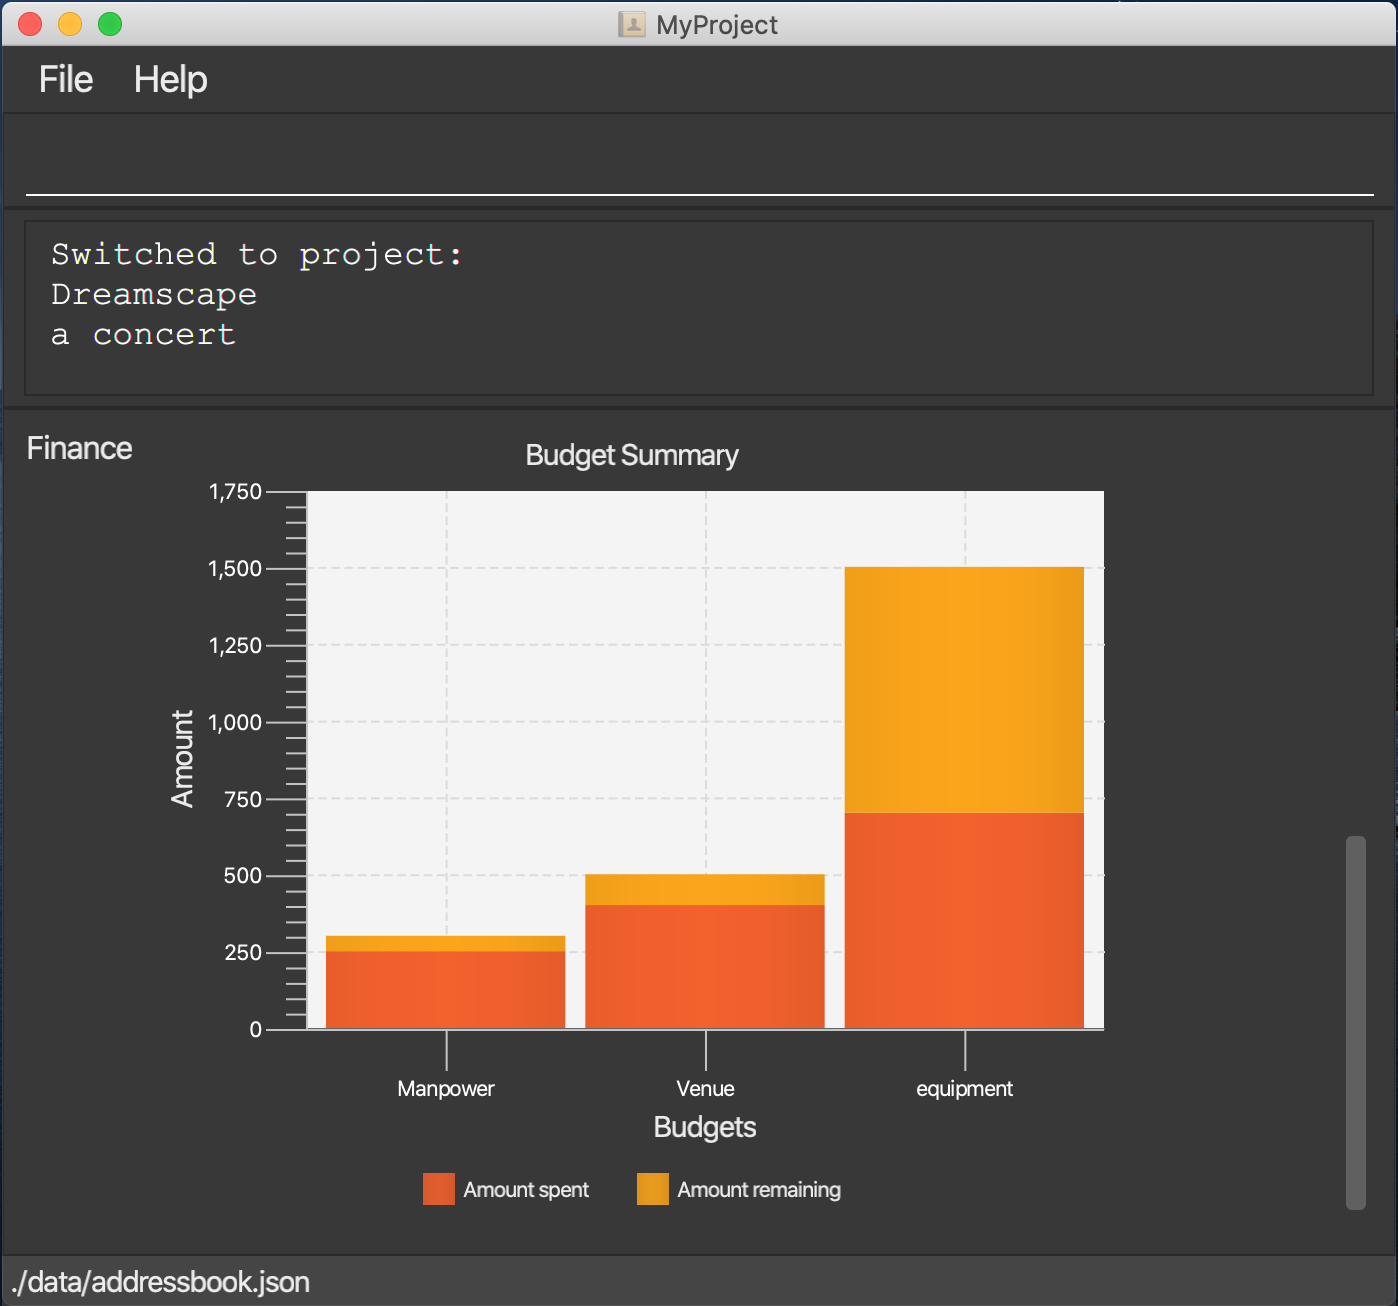
After all that have been done, a breakdown of the budget situation will be available at the project overview with a stacked bar graph indicating the amount remaining and the amount spent.
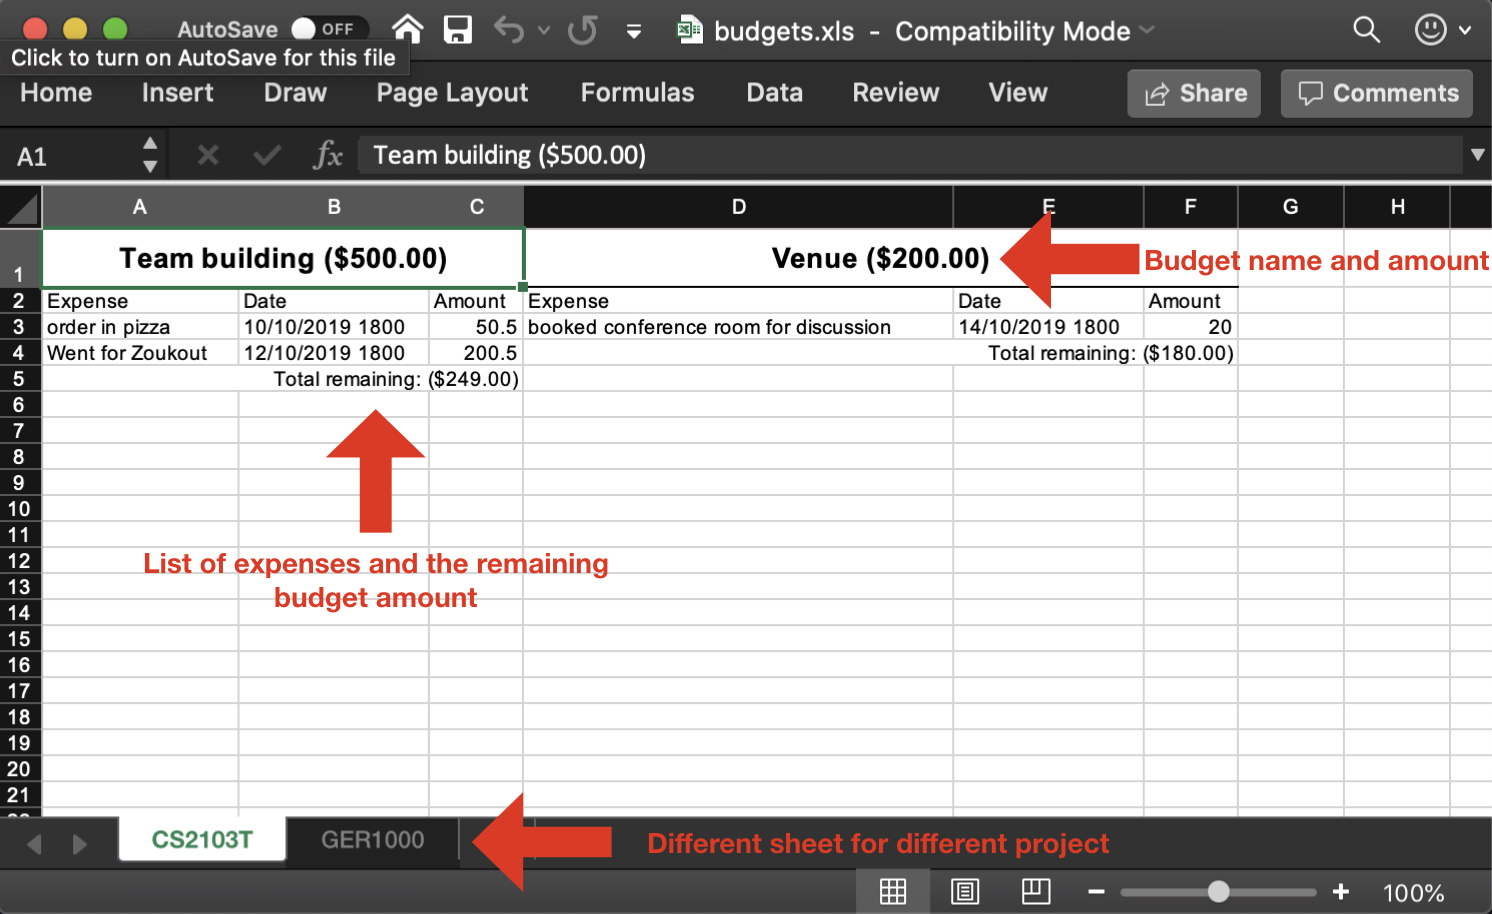
Excel sheet storage
Keeping the planning committee updated regarding budget is always a challenge isn’t it? Fret not, MyProject is here to help! Every update on the budget information will be recorded in an excel sheet located in the budgets folder. It creates a sheet per project and display the budgets and expenses under the budget in a table form. You can easily send this comprehensible document to your team members to update them!
Contribution to Developer Guide
This section is rather intuitive for the user but it is not really the case for developers thus I would like to feature my documentation of this part in the developer guide.
Checkout
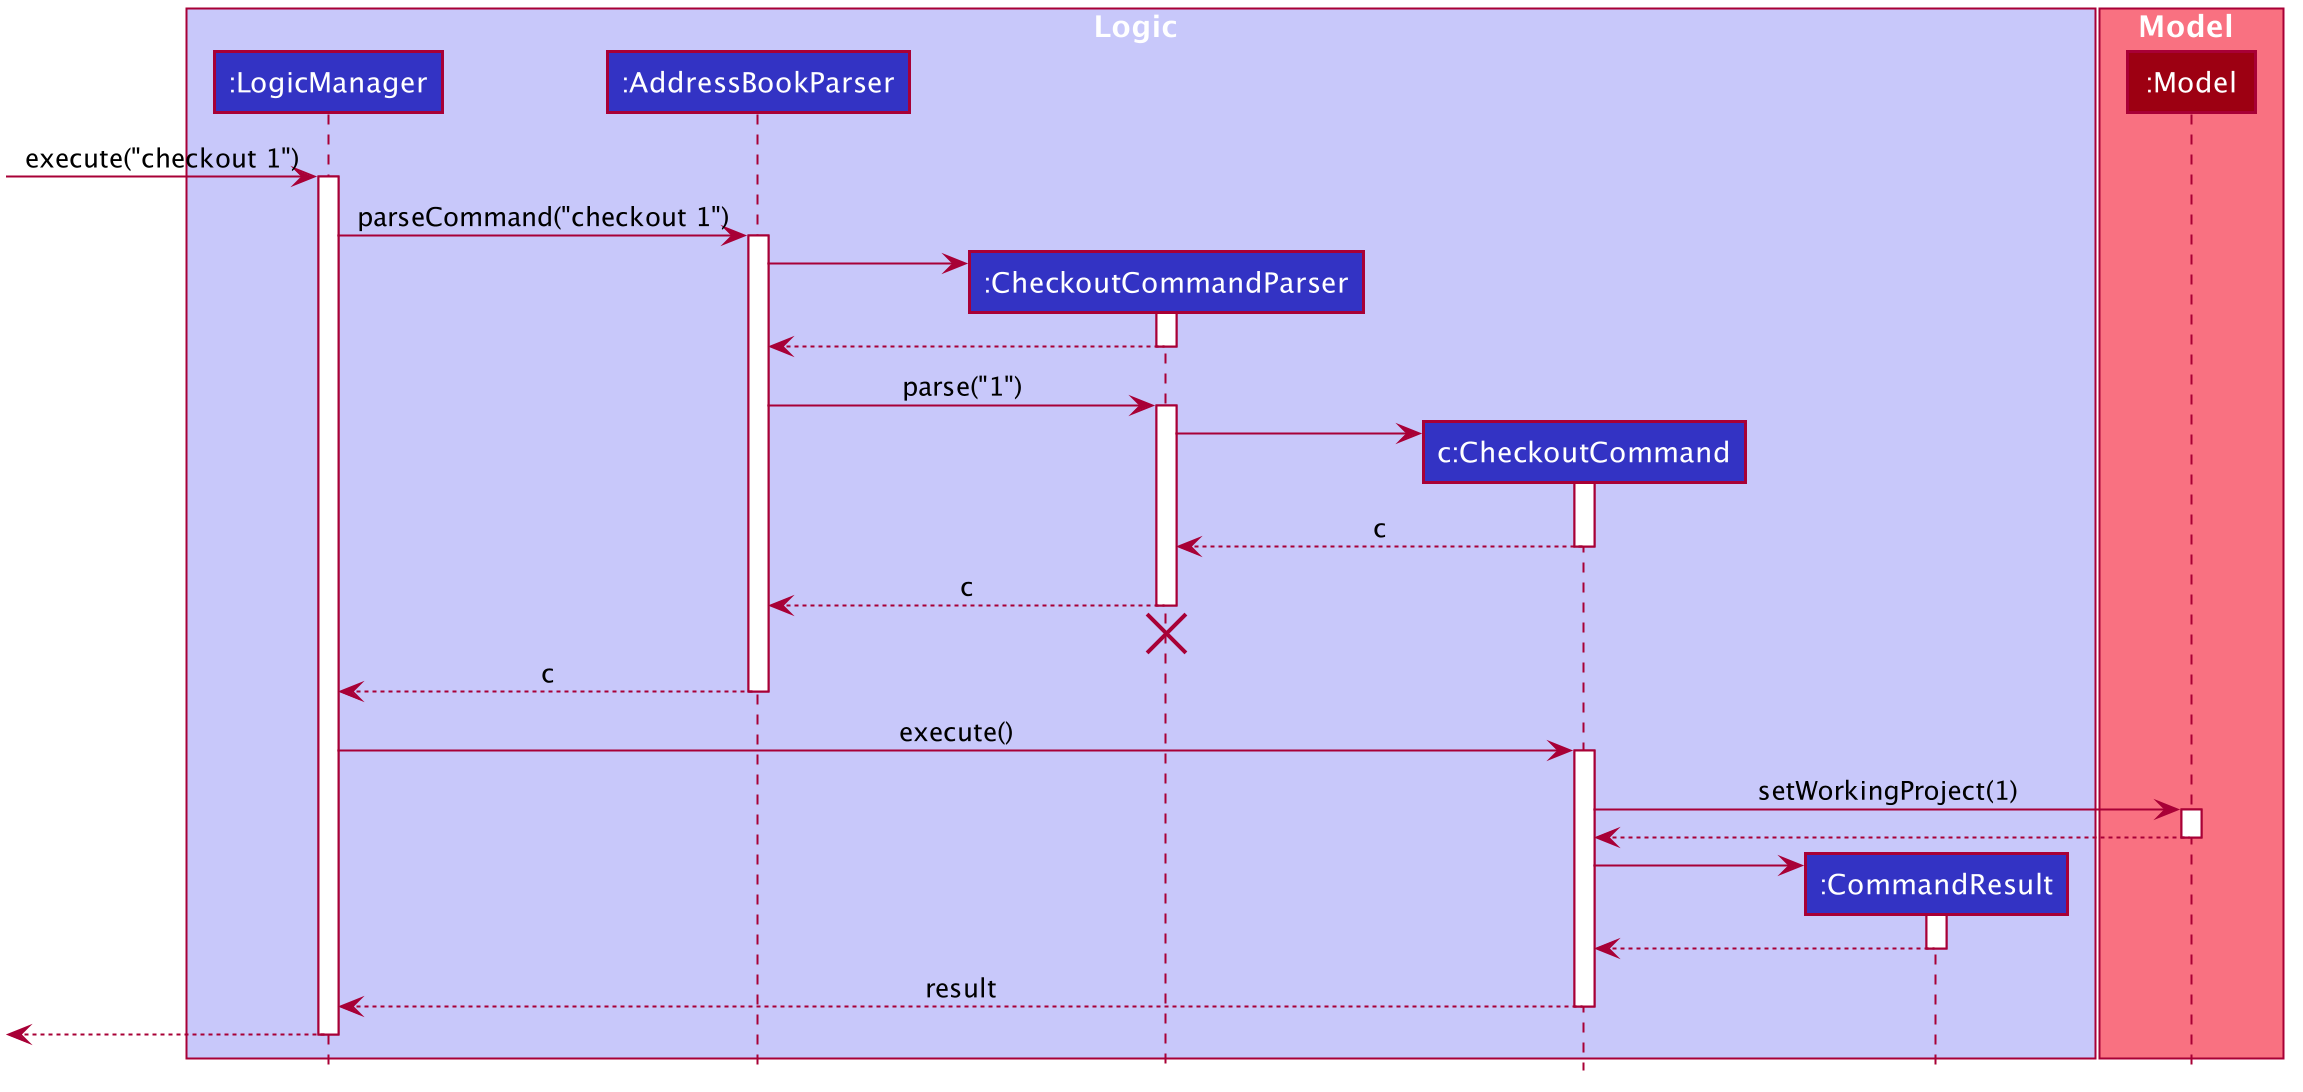
This allows user to checkout to a project from a list of project to work on it. Almost every command regarding the project require the user to checkout first.
For it to work, the ModelManager class is holding an additional Optional<Project>
attribute and the model supports three new methods:
-
setWorkingProject()— Sets the attribute to the argument of the method. -
getWorkingProject()— Returns the current project. -
isCheckedOut()— Checks whether the current working project is empty. -
removeWorkingProject— Sets the attribute toOptional.empty().
A typical use of the command can be seen in the sequence diagram below.
Change in UI display
The first step of changing UI display is to find out whether a change in UI is needed given a command from user. This is done in the CommandResult class constructor. If a command word matches actions that is email related or help or exit, the flag will indicate that a change in UI is not needed.
Next, a class to represent the state of UI is needed to remember
a history which is the UiEvent class.UiEvent is a class that represent
a type of UiDisplay as an event. It stores the current state of the
application’s UI and the current working project index if it exists.
Whenever a command is executed, a new UiEvent will be generated and stored in history
if this command lead to a state
that is different from the current one.
The viewHistory is stored in the MainWindow class as a stack of UiEvents
and the class also maintains a currentStatePointer. When a back command
is executed, it can check back on what is the previous state.
-
MainWindow#changeUiDisplay— Change the Ui and change the current state. -
MainWindow#getPreviousState— Pops the stack and peek to look for the previous state. -
MainWindow#handleBack— Change the Ui display to the previous state. -
MainWindow#getState— Get the state given a command word.
Given below is an example of how the UI behave at each step.
Step 1. The user launches the application and the viewHistory will be initialized with the
PROJECT_LIST state. The currentStatePointer is currently pointing to
that single address book state.

Step 2. The user executes checkout 1 command to checkout to project 1 to work on.
During the execution of the checkout command, when commandresult is created,
it detects that there is a need to change the Ui and the flag is made to true.
In the MainWindow, since a change is needed, MainWindow#changeUiDisplay is called
to change the display to PROJECT_OVERVIEW which is found out using
the MainWindow#getState method. It also set the currentState to be PROJECT_OVERVIEW.
The UiEvent with the state of PROJECT_LIST and an empty index will be stored
in the viewHistory stack.

Step 3. The user now decide to add a budget by addBudget b/ equipment 3000.00.
This command does need a change in Ui display but the state of this command
is exactly the same as the previous command thus MainWindow#changeUiDisplay
will be called with the same state.
Thus, the method MainWindow#changeUiDisplay is still called but this time
it is called to update the information in the current display and set the
current state to be still the current state. Thus, the currentStatePointer does
not move.

If a command fails its execution, a commandResult wont be generated thus no change in Ui will happen.
|
Step 4. The user now wants to have a better view of the budgets and executes
listBudget. Same step follows through the checkout command.

Step 5. The user now decides to go back to the home page and executes
two consecutive back command. At the execute stage in MainWindow,
it detects it is a back command and MainWindow#handleBack is called.
This method will then pop the current state by MainWindow#getPreviousState
and call MainWindow#changeUiDisplay to display the previous Ui.


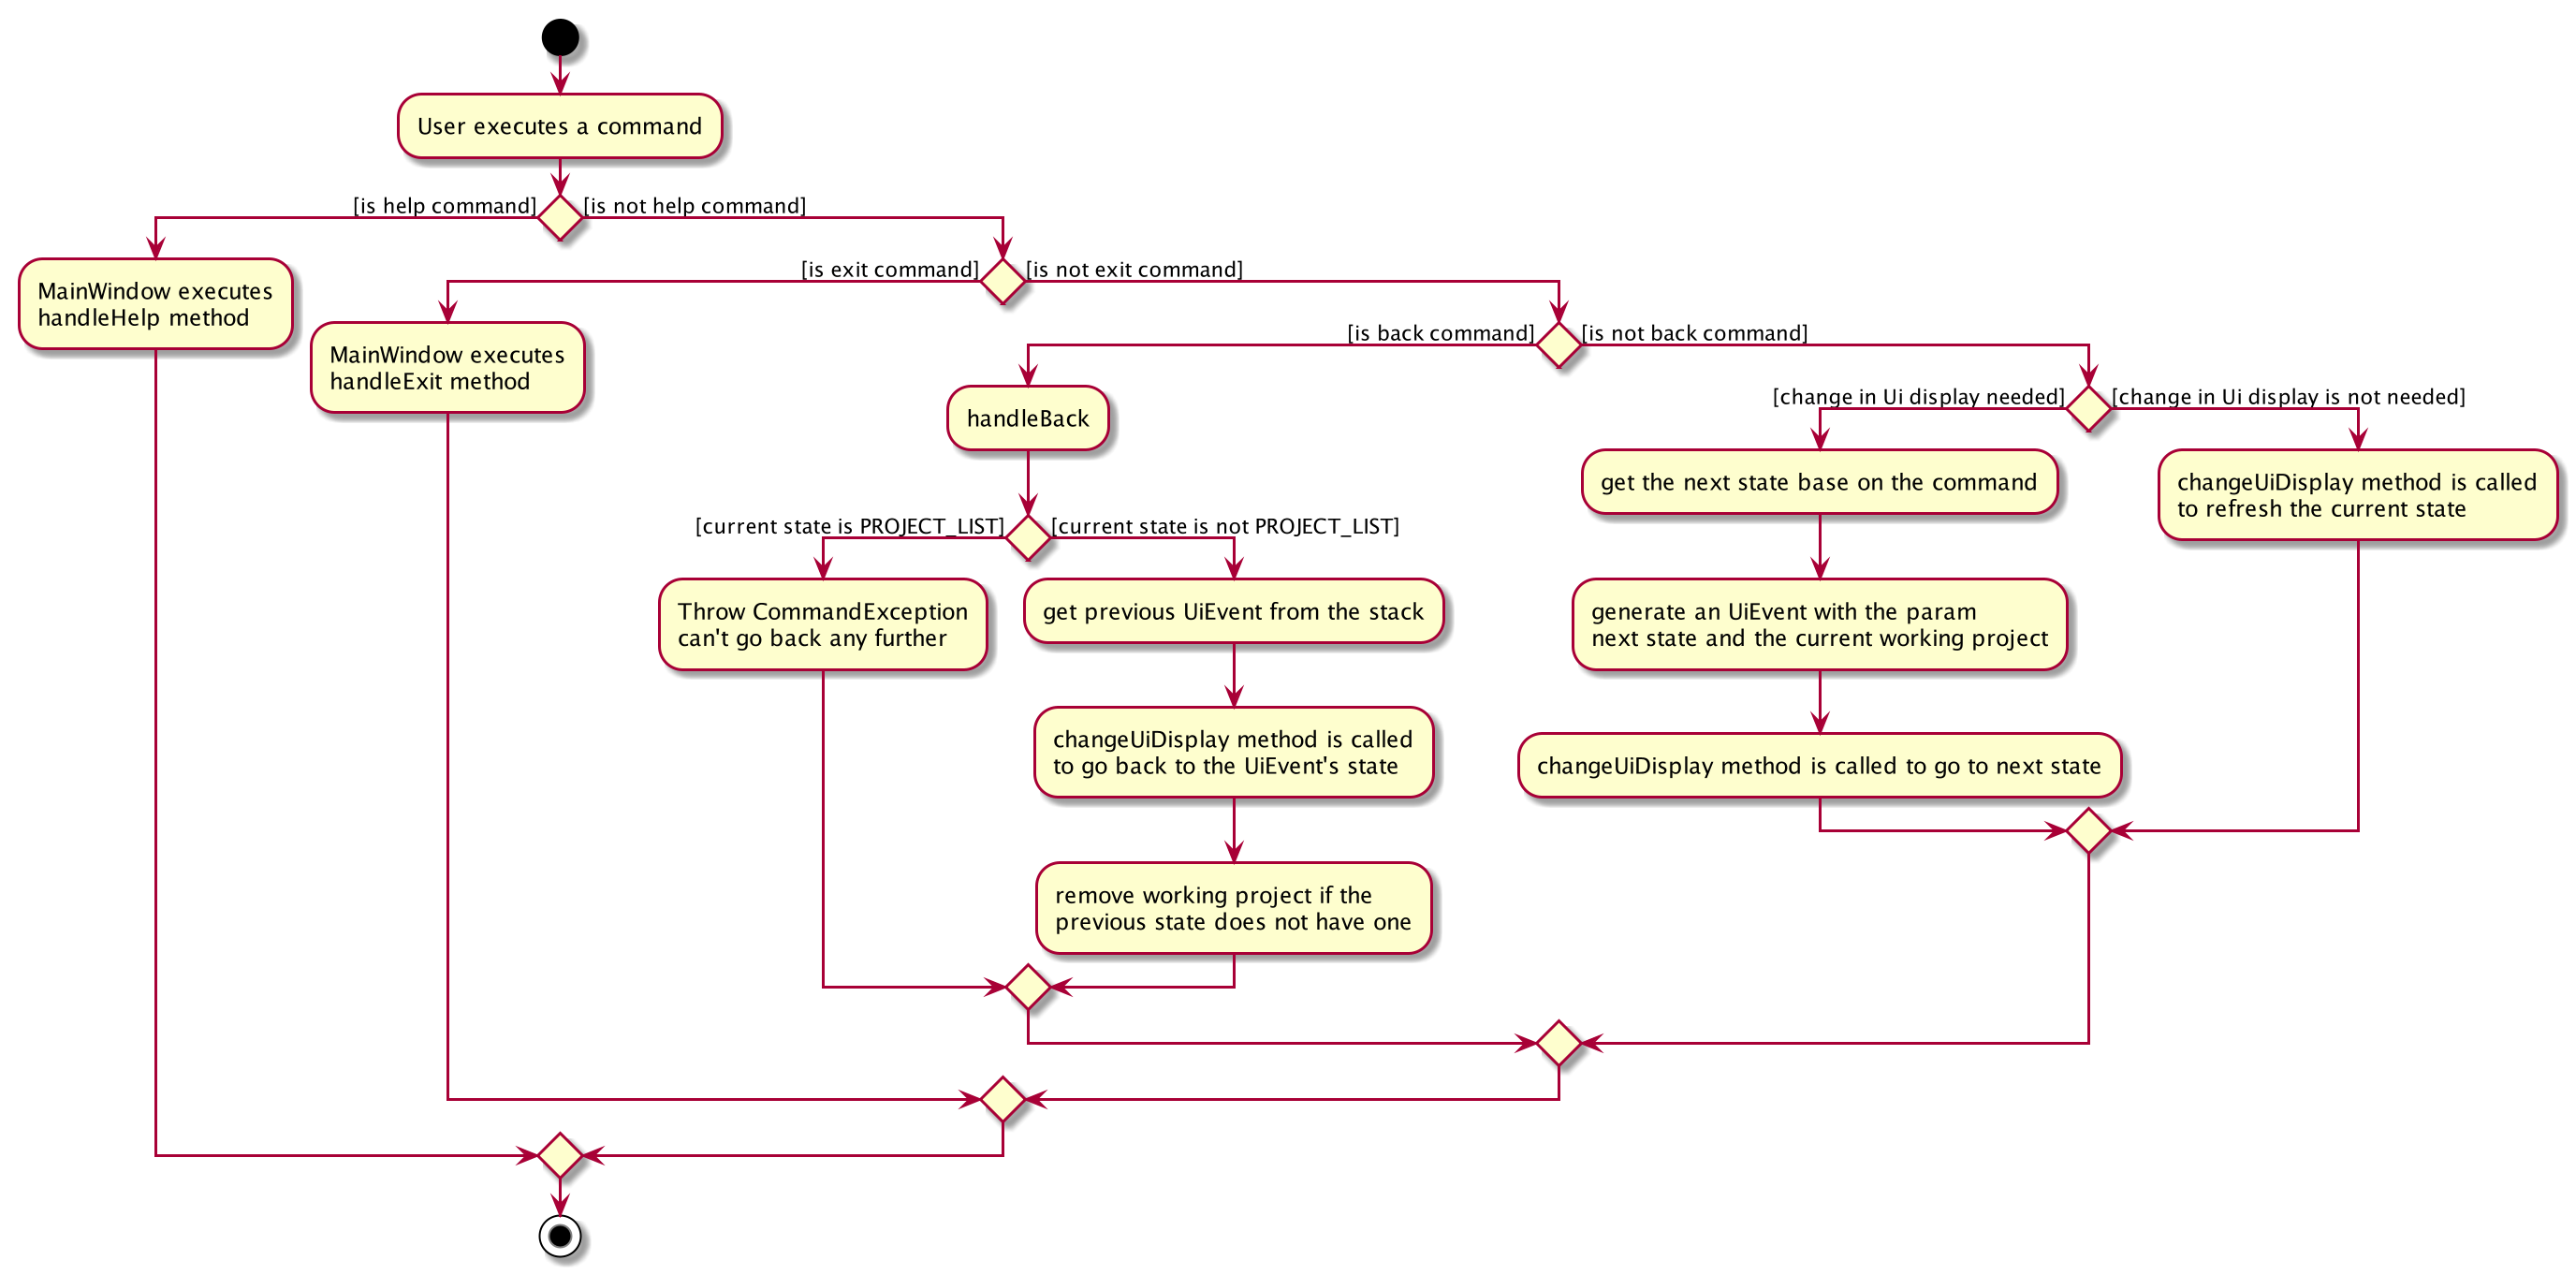
If the currentStatePointer is at PROJECT_LIST, then there are
no previous UI states to go back. Under such situation, an error will be returned.
|