By: T17-1 Since: Oct 2019 Licence: MIT
- 1. Setting up
- 2. Design
- 3. Implementation
- 3.1. Task feature
- 3.2. Meeting feature
- 3.3. Member feature
- 3.4. Sorting feature
- 3.5. Sending Reminder feature
- 3.6. Broadcast Mail feature
- 3.7. Sign In feature
- 3.8. Timetable input
- 3.9. Generate meeting timeslot
- 3.10. Logging
- 3.11. Configuration
- 3.12. Finance feature
- 3.13. Checkout
- 3.14. Change in UI display
- 3.15. Performance Tracking
- 4. Documentation
- 5. Testing
- 6. Dev Ops
- Appendix A: Product Scope
- Appendix B: User Stories
- Appendix C: Use Cases
- Appendix D: Non Functional Requirements
- Appendix E: Glossary
- Appendix F: Product Survey
- Appendix G: Instructions for Manual Testing
1. Setting up
Refer to the guide here.
2. Design
2.1. Architecture
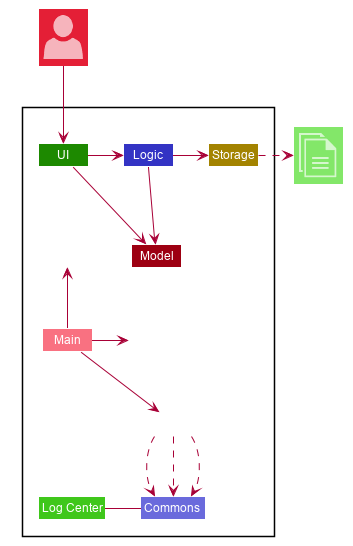
The Architecture Diagram given above explains the high-level design of the App. Given below is a quick overview of each component.
The .puml files used to create diagrams in this document can be found in the diagrams folder.
Refer to the Using PlantUML guide to learn how to create and edit diagrams.
|
-
At app launch: Initializes the components in the correct sequence, and connects them up with each other.
-
At shut down: Shuts down the components and invokes cleanup method where necessary.
Commons represents a collection of classes used by multiple other components.
The following class plays an important role at the architecture level:
-
LogsCenter: Used by many classes to write log messages to the App’s log file.
The rest of the App consists of four components.
Each of the four components
-
Defines its API in an
interfacewith the same name as the Component. -
Exposes its functionality using a
{Component Name}Managerclass.
For example, the Logic component (see the class diagram given below) defines it’s API in the Logic.java interface and exposes its functionality using the LogicManager.java class.
How the architecture components interact with each other
The Sequence Diagram below shows how the components interact with each other for the scenario where the user issues the command delete 1.
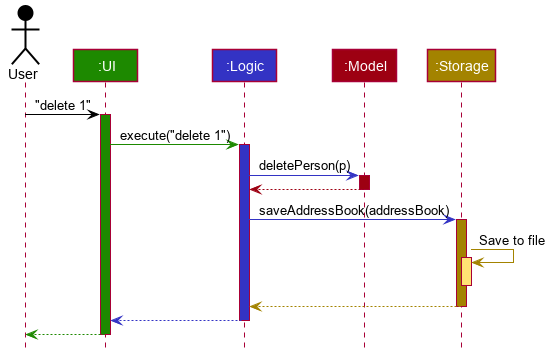
delete 1 commandThe sections below give more details of each component.
2.2. UI component
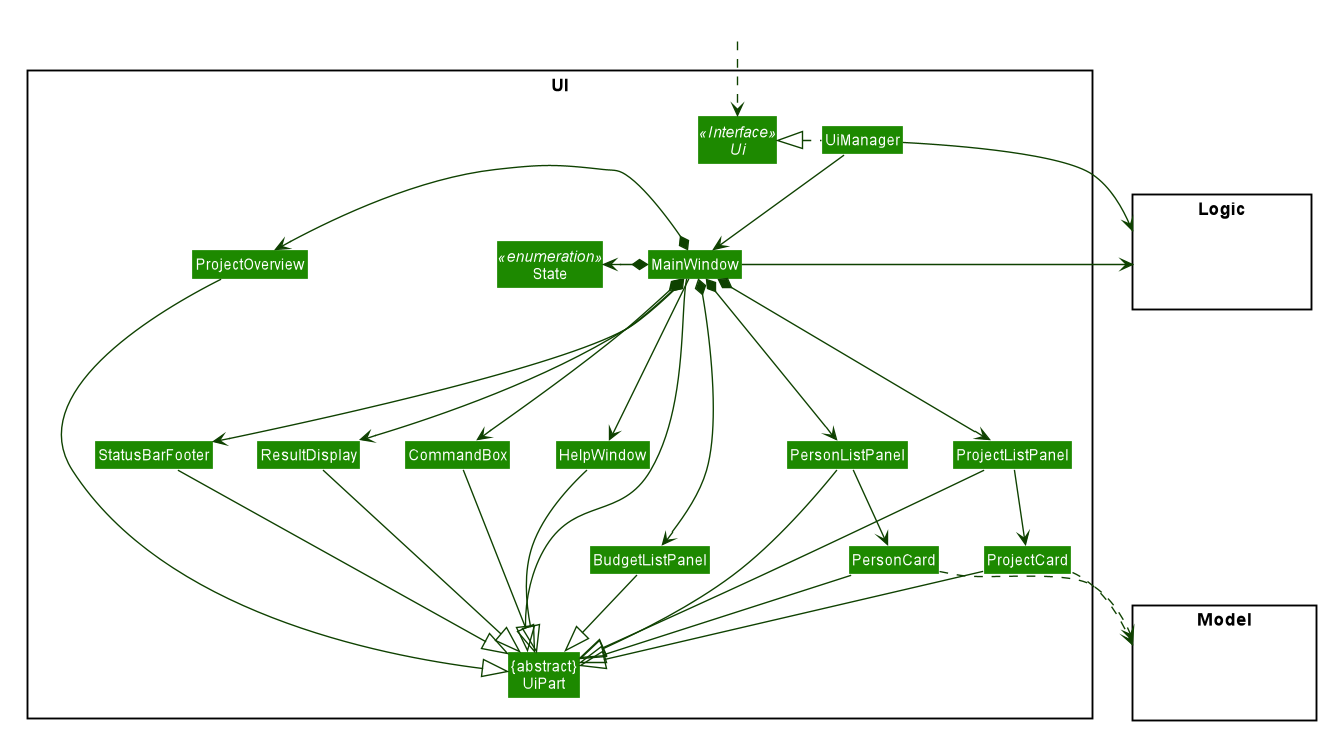
API : Ui.java
The UI consists of a MainWindow that is made up of parts e.g.CommandBox, ResultDisplay, PersonListPanel, StatusBarFooter etc. All these, including the MainWindow, inherit from the abstract UiPart class.
The UI component uses JavaFx UI framework. The layout of these UI parts are defined in matching .fxml files that are in the src/main/resources/view folder. For example, the layout of the MainWindow is specified in MainWindow.fxml
The UI component,
-
Executes user commands using the
Logiccomponent. -
Listens for changes to
Modeldata so that the UI can be updated with the modified data.
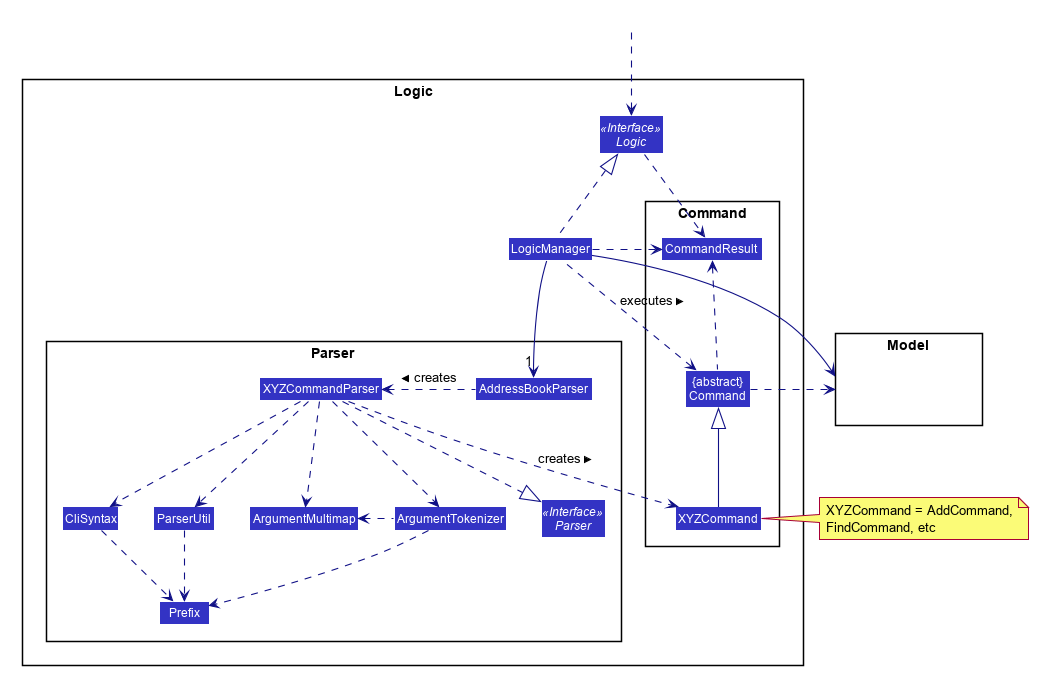
2.3. Logic component
API :
Logic.java
-
Logicuses theAddressBookParserclass to parse the user command. -
This results in a
Commandobject which is executed by theLogicManager. -
The command execution can affect the
Model(e.g. adding a person). -
The result of the command execution is encapsulated as a
CommandResultobject which is passed back to theUi. -
In addition, the
CommandResultobject can also instruct theUito perform certain actions, such as displaying help to the user.
Given below is the Sequence Diagram for interactions within the Logic component for the execute("delete 1") API call.
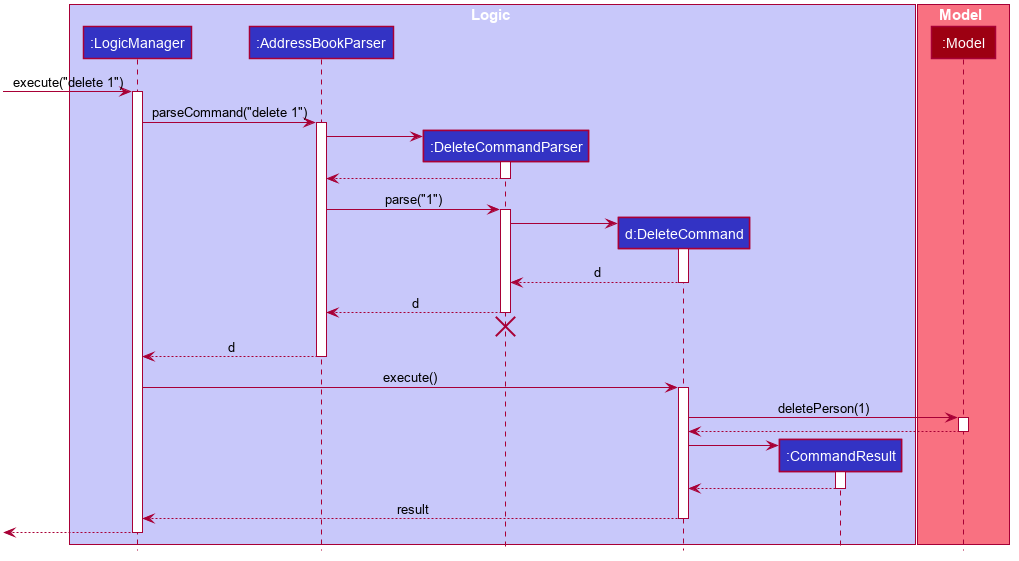
delete 1 Command
The lifeline for DeleteCommandParser should end at the destroy marker (X) but due to a limitation of PlantUML, the lifeline reaches the end of diagram.
|
2.4. Model component
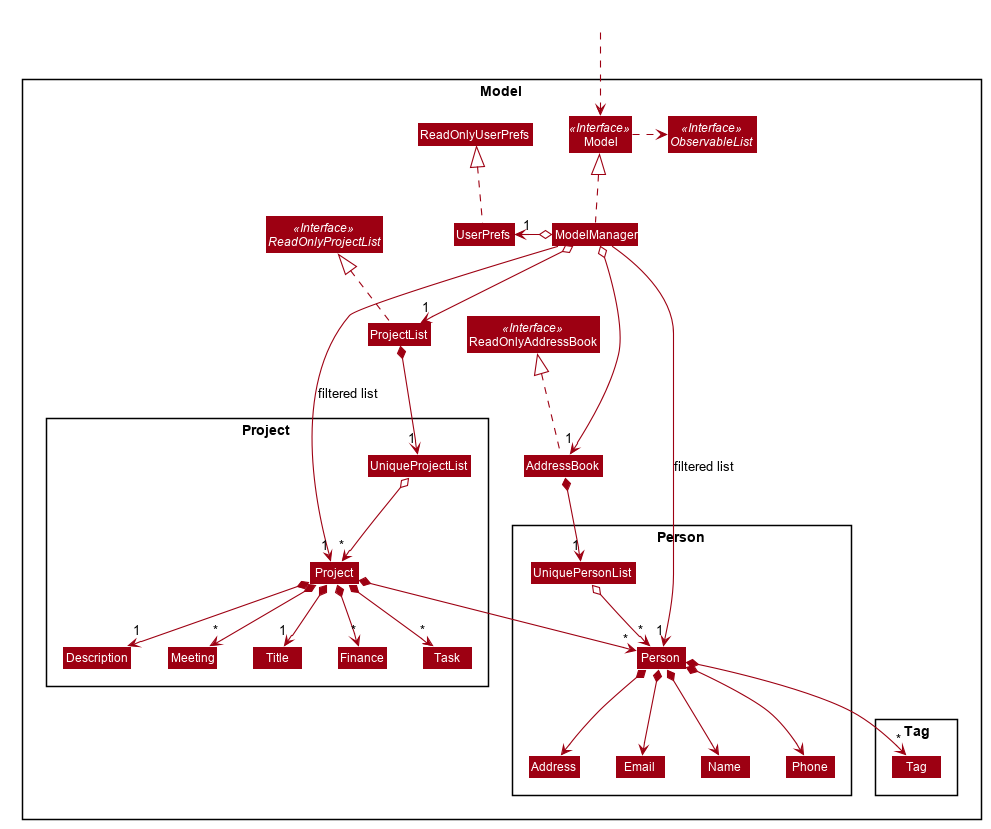
API : Model.java
The Model,
-
stores a
UserPrefobject that represents the user’s preferences. -
stores the Address Book data.
-
exposes an unmodifiable
ObservableList<Person>that can be 'observed' e.g. the UI can be bound to this list so that the UI automatically updates when the data in the list change. -
does not depend on any of the other three components.
As a more OOP model, we can store a Tag list in Address Book, which Person can reference. This would allow Address Book to only require one Tag object per unique Tag, instead of each Person needing their own Tag object. An example of how such a model may look like is given below.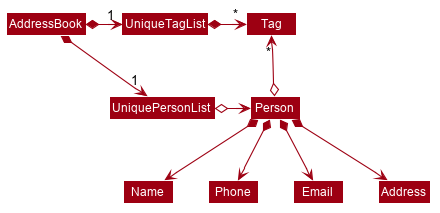
|
2.5. Storage component
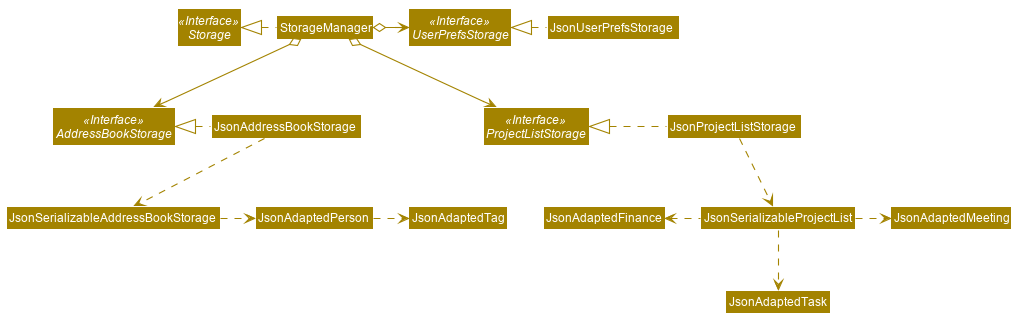
API : Storage.java
The Storage component,
-
can save
UserPrefobjects in json format and read it back. -
can save the Address Book data in json format and read it back.
2.6. Common classes
Classes used by multiple components are in the seedu.addressbook.commons package.
3. Implementation
This section describes some noteworthy details on how certain features are implemented.
3.1. Task feature
3.1.1. Description of feature
Within every project, there are tasks to be done or milestones to be achieved within certain deadlines. The diagram below shows the class diagram of the task class and how it interacts with the model.
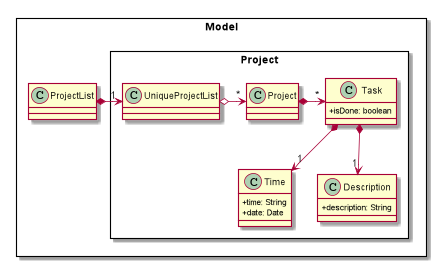
As shown above, each project stores multiple tasks in a list. These tasks can be stored, deleted, edited and sorted very easily. Here are some task related commands that can be executed by the app.
-
addTask - adds a task into the project model.
-
deleteTask - removes a task from the project model based on index specified by user
-
editTask - edits a task of the given index with attribute/s to edit e.g deadline/description/whether is done
-
sortTask - sorts the list of tasks based on specification given by user. (more info available in section 3.3)
3.1.2. Details
As seen in figure 9, each task consists of 3 parameters namely description, time and a boolean state to show whether the task is done/in progress.
A typical task will look like this on the app:

3.2. Meeting feature
3.2.1. Description of feature
Within every project, there are meetings to be held at certain time. The diagram below shows the class diagram of the meeting class and how it interacts with the model.
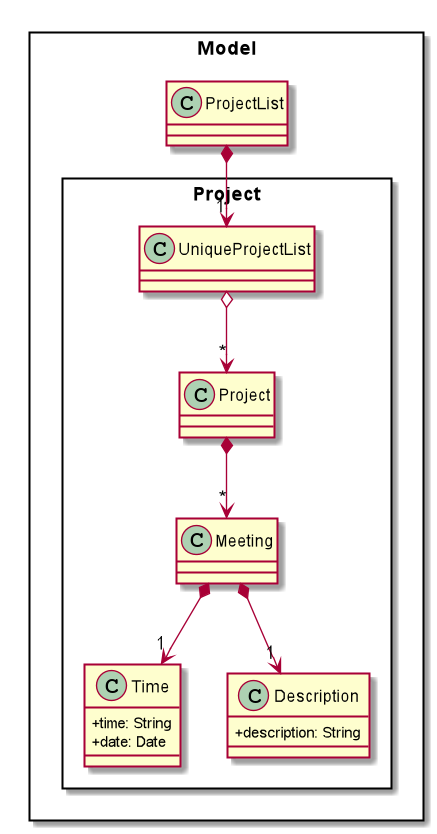
As shown above, each project stores multiple meetings in a list. These meetings are automatically sorted based on the time in ascending order. Here are some meeting related commands that can be executed by the app.
-
addProjectMeeting - adds a meeting into the project model.
-
deleteProjectMeeting- removes a meeting from the project model based on index specified by user
3.2.2. Details
As seen in figure 10, each meeting consists of 2 parameters namely description and time to show what is the meeting about and the date and time of the meeting respectively. A typical meeting will look like this on the app:

3.3. Member feature
3.3.1. Description of feature
In every project, it almost certain that there are members. Therefore we have allowed for the users to be able to
track who are the members, and how many members there are within each project. Each Project stores its members as a list
of strings representing their names, and similarly each Person stores the projects they are involved in
as a list of strings representing the project titles. Below you will find 2 diagrams which represents this relationship.
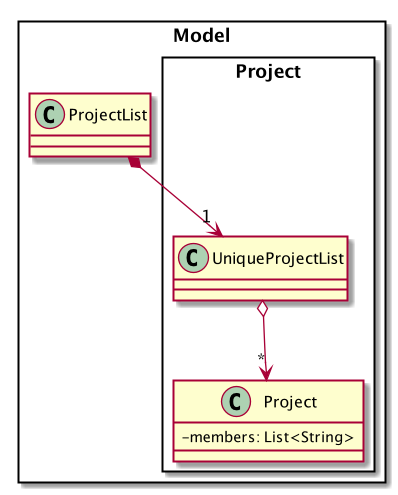
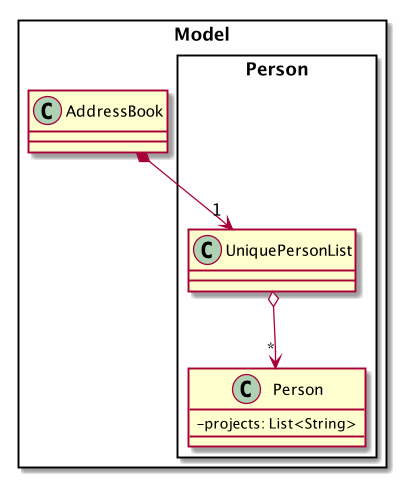
Whenever member is mentioned it should be known that it is represented by a Person.
|
In order to facilitate this feature, 4 commands are implemented as a subclass of the Command class:
-
addMember- Adds a newPersonto the contacts an records the name as a member of the current working project. -
addFromContacts- Adds aPersonto the current working project as a member. -
removeMember- Removes the record of thePersonas a member of the current working project. -
addProfilePicture- Adds a profile picture to the specifiedPerson.
3.3.2. Implementation
In this section, we will demonstrate how a member is added to the project from your contacts, and also how a member as a new Person.
We will start with adding a new Person to your contacts, and to your project at the same time.
Step 1. The user enters the addMember command with the following parameters n/David p/94328727 e/david97@hotmail.com a/Ang Mo kio
avenue 3.
Full user input: addMember n/David p/94328727 e/david97@hotmail.com a/Ang Mo kio
avenue 3
The user input is parsed into an ArgumentMultiMap by AddMemberCommandParser#parse so that every attribute of the person can be
extracted, and put into a NewMemberDescriptor to be used to correctly create the Person.
ArgumentMultimap is a class that stores all the parsed parameters from the user input.
|
NewMemberDescriptor is a class that stores any all the information on the Person given by the user to be used
to create the Person subsequently.
|
Step 2. The information of the person is stored in the NewMemberDescriptor, and used to create a new instance of the AddMemberCommand
Every Project keeps track of which members are involved by storing a list of strings of the names of the members. Similarly a Person keeps track of which projects they are involved in by storing a list of strings of the project titles.
The following commands are implemented to support this feature:
-
addMember- Adds a new person to the contacts as well as to the current working project. -
addFromContacts- Adds a person currently stored in your contacts to the current working project. -
removeMember- Removes a person from the current working project. -
addProfilePicture- Adds a profile picture to a person in the contacts.
3.4. Sorting feature
3.4.1. Description of feature
Sorts some lists based on specifications provided by the user.
There are 3 lists that are able to be sorted so far.
-
Sort list of tasks
-
Sort list of spending
-
Sort list of meetings
The implementation is similar for these 3 methods. It makes use of SortingOrder, which is
a container class that stores the current sort order as well as methods to get and set these orders.
SortingOrder can be found in the model package.
Currently there are 5 different methods to sort the lists.
-
Alphabetical order
-
Increasing order of time
-
Whether tasks are done
-
Whether tasks are done and then by increasing order of time
-
Increasing price
| Methods 3-4 are only for sorting tasks whereas method 5 is for sort spending. Methods 1-2 can be used to sort all lists. |
3.4.2. Details
All sort commands take in a single integer as parameter. As mentioned in the note above, integers 1-4 are valid input for sortTask, integers 1, 2 and 5 are valid for sortSpending, and integers 1-2 are valid for sortMeeting.
An example command would be sortTask 1 which sorts the list of tasks by alphabetical order.
The following sequence diagram shows the process of obtaining a list with the new sorting order
and updating the current sort order in SortingOrder class.
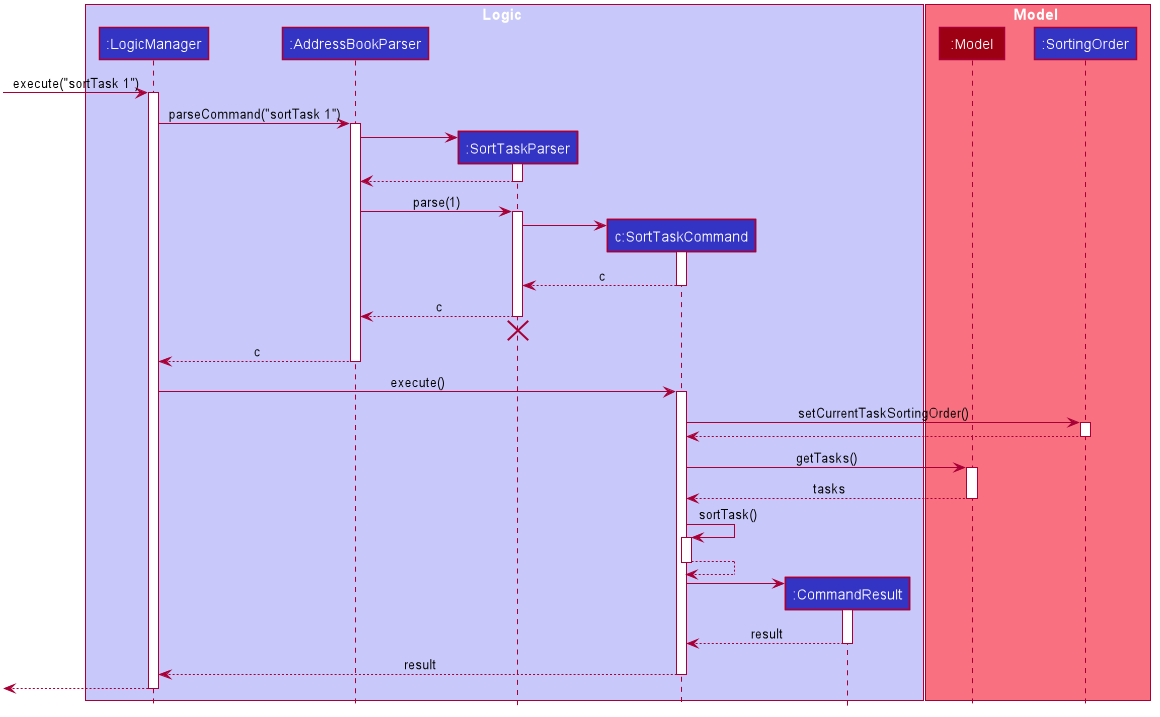
These are the stages shown in figure 9. Stages are similar for sort spending as well.
-
Parses the input to obtain the index.
-
Goes to
SortingOrderto change the current sorting order to the one linked to the given index based on the specification shown above. -
Obtains list of tasks from model and sorts it. List now maintains this sorting order and displays a sorted list even after adding or editing elements.
-
Display the newly sorted task list.
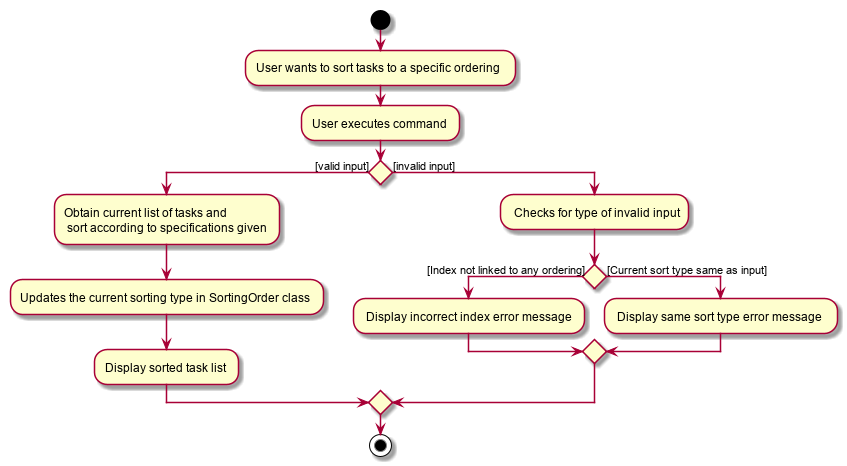
The diagram above shows sortTask works. There are 2 possible error messages that can occur. Firstly,
if the user inputs an index that is not applicable to the type of items sorted. For example, sortTask 5
is invalid as index 5 is linked to a price sorting mechanism which is not applicable to sorting tasks. Secondly,
an error will be shown if the user attempts to sort the items in the same order is the current sorting order.
For example, since the default sorting order for tasks is by increasing order of date, the command sortTask 2
will be invalid if the sorting order has never been changed before. Otherwise if the input is valid,
the sorting will occur and the newly sorted task list will be displayed.
3.4.3. Design considerations
Aspect: Data structure to support the sort commands
-
Alternative 1 (current choice): Store the data in list.
-
Pros: Easy to implement. Easy for new Computer Science student undergraduates to understand, who are likely to be the new incoming developers of our project.
-
Cons: May have performance issues as list has to be sorted every time a new element is added or edited.
-
-
Alternative 2: Store the data in a PriorityQueue.
-
Pros: Much more efficient in terms of performance and complexity. Internal list will automatically be updated which means no additional sorting needed when adding or editing new elements.
-
Cons: Have to create and add all the tasks into another PriorityQueue if the sorting order were to be changed. Harder to implement.
-
3.5. Sending Reminder feature
3.5.1. Description of feature
Sends reminder for tasks and meetings that are due in the number of days given by the user input.
The basic implementation uses javax.Mail to send email to other email addresses. The Mailer class has static method sendEmail which is responsible for sending all kinds of email to a given recipient(s). User’s email account information is stored in the Model class and subsequent queries regarding mailing will use this information that has been stored to send the email. Currently, only gmail server has been made available for use in sending the emails.
| User Email Account Information is stored through the signIn command. |
3.5.2. Details
SendReminder takes in a single integer as parameter. The integer will be the duration in days from the current times in which the meetings and tasks are due.
The following sequence diagram shows the process of sending reminder to the project members.
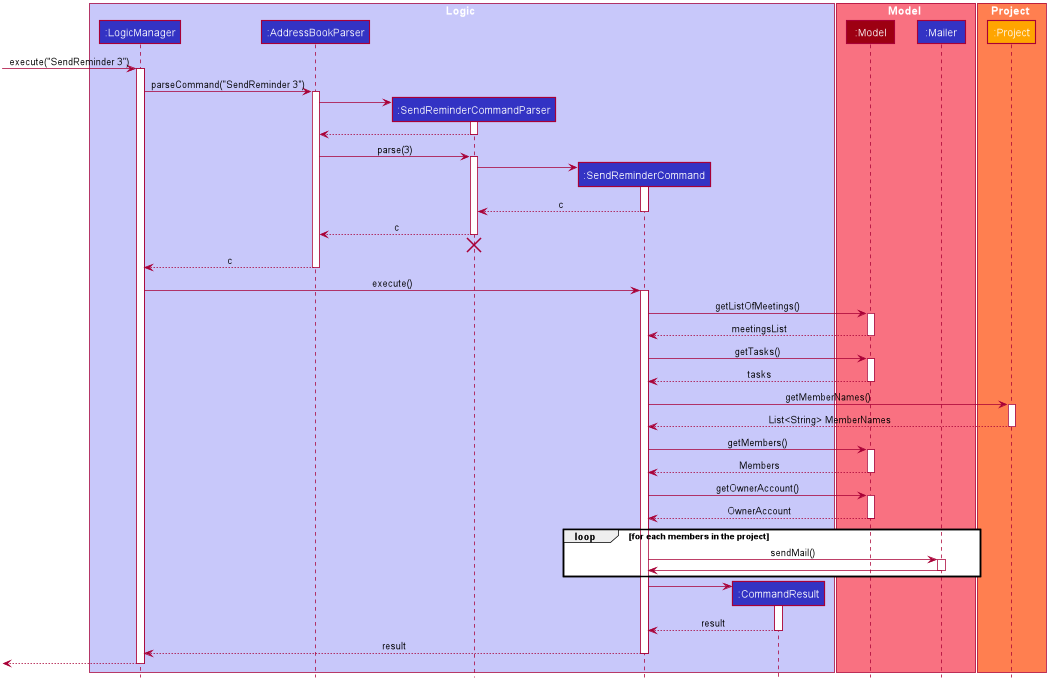
These are the stages shown in figure 15.
-
Parses the input to obtain the duration.
-
Goes to
Modelto get the the Meetings and Tasks. -
Obtains list of tasks and meetings which are due in the duration time.
-
Goes to
Projectto get the Members names. -
Goes to
Modelto get the members in the project. -
Goes to
Modelto get the OwnerAccount information. -
Sends email to all the members about the upcoming meetings and tasks in the project.
-
Display the success message.

The diagram above shows how sendReminder works. There are 2 possible error messages for invalid input. Firstly,
if the user inputs nothing as the duration and input cannot be empty error message is shown. Secondly,
an error will be shown if the user non-numeric or negative or zero number as the duration of time. For a valid input,
user will be required to checkout then signIn first before executing the command.
3.5.3. Design considerations
Aspect: Data structure to support the sendReminder commands
-
Alternative 1: Storing List<Person> in the Project for members.
-
Pros: Easy to implement. Do not need to look for the person object in the addressBook from the List of String of members' names in the project.
-
Cons: Introduces coupling and may cause unwanted bugs due to cyclic dependencies as Project contains Person and Person contains Project.
-
-
Alternative 2: Stores members as List<String> of members names.
-
Pros: Reduces coupling and and eliminates cyclic dependencies between Project and Person object..
-
Cons: Have to hash the members object in the addressBook by names and go through the List<String> of members' names one by one to get the Person object of the member. Harder to implement.
-
3.6. Broadcast Mail feature
3.6.1. Description of feature
Broadcast an email to all members in the project.
Similar to sendReminder, the basic implementation uses javax.Mail to send email to other email addresses. The Mailer class has static method sendEmail which is responsible for sending all kinds of email to a given recipient(s). User’s email account information is stored in the Model class and subsequent queries regarding mailing will use this information that has been stored to send the email. Currently, only gmail server has been made available for use in sending the emails.
| User Email Account Information is stored through the signIn command. |
3.6.2. Details
BroadcastMail takes in a two String, an email Subject and Body. The subject will be the email title which are normally on the email header and the body will be the message body of the email.
The following sequence diagram shows the process of broadcast email to the project members.
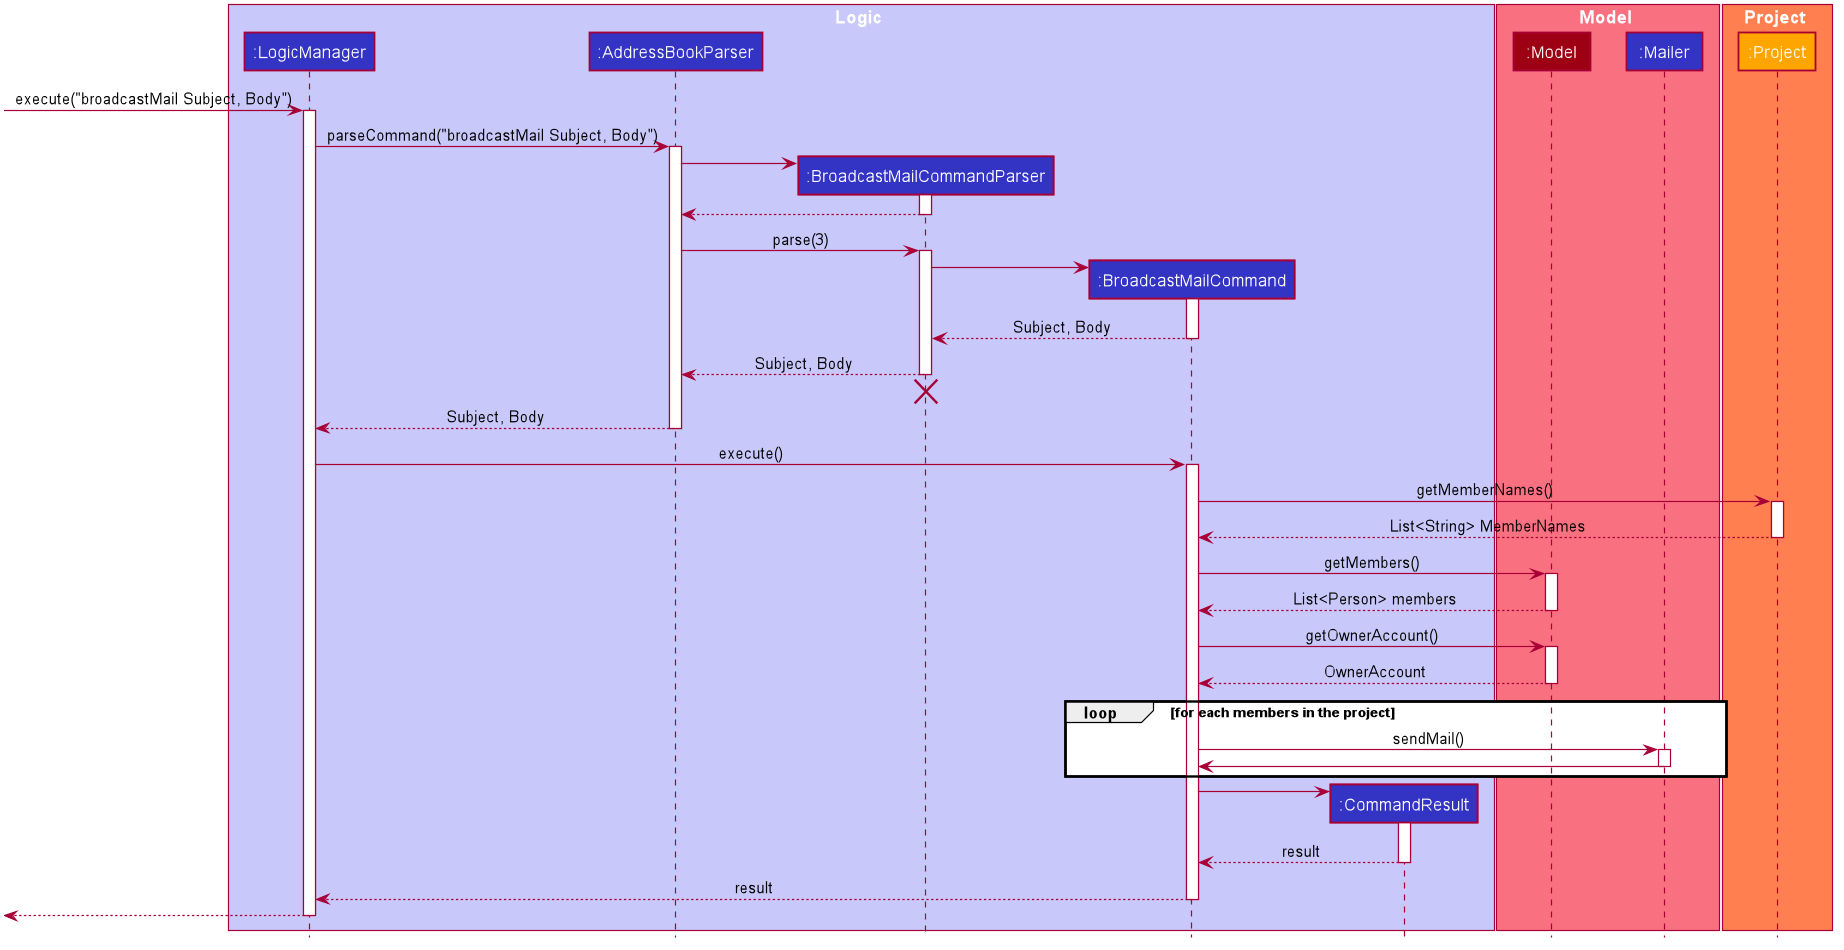
These are the stages shown in figure 15.
-
Parses the input to obtain the Subject and Body of the email.
-
Goes to
Projectto get the Members names. -
Goes to
Modelto get the the members in the project. -
Goes to
Modelto get the OwnerAccount information. -
Sends email to all the members with header Subject and message Body.
-
Display the success message.
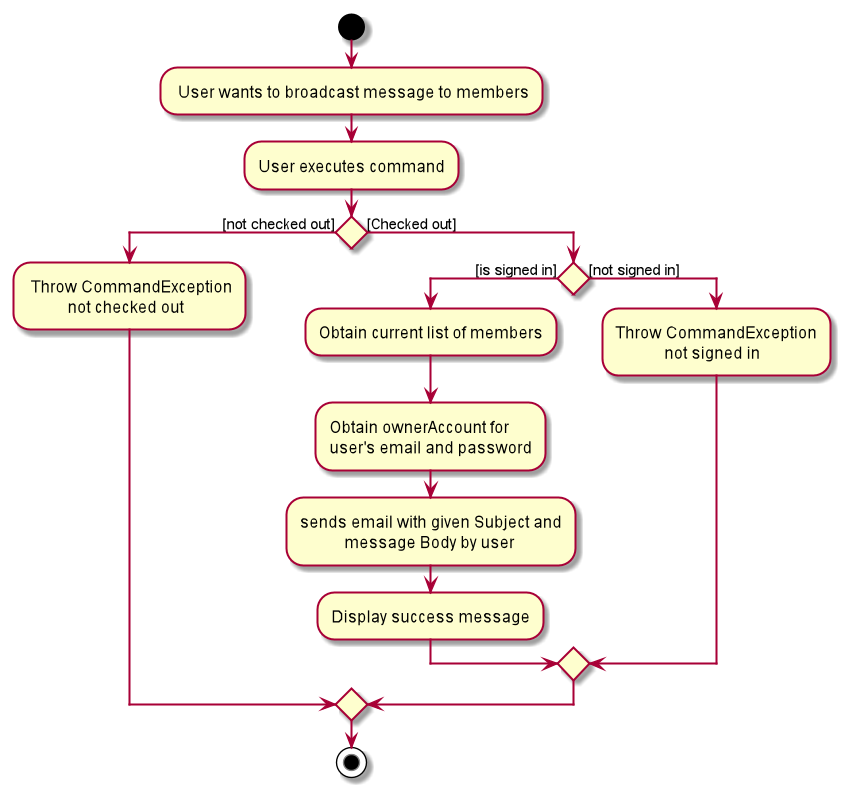
The diagram above shows how broadcastMail works. When the command is executed, it will throw a CommandException if the user
has not checked out or have not signed in. Otherwise, broadcast message will be executed normally.
3.6.3. Design considerations
Aspect: Data structure to support the broadcastMail commands
The alternatives are similar to sendReminder as the underlying problem lies in sending email to all the members in the project group.
3.7. Sign In feature
3.7.1. Description of feature
Signs in using a Google account for mailing purposes.
The basic implementation uses javax.Mail to check for the validity of the email address and password. User’s email account information is stored in the Model class through this command.
| In this version, only gmail server has been made available for use in signing in and sending emails. |
3.7.2. Details
signIn takes in two inputs, first is the email address of the user (in gmail), second is the password to the email address.
The following sequence diagram shows the process of signing in to the user’s account.
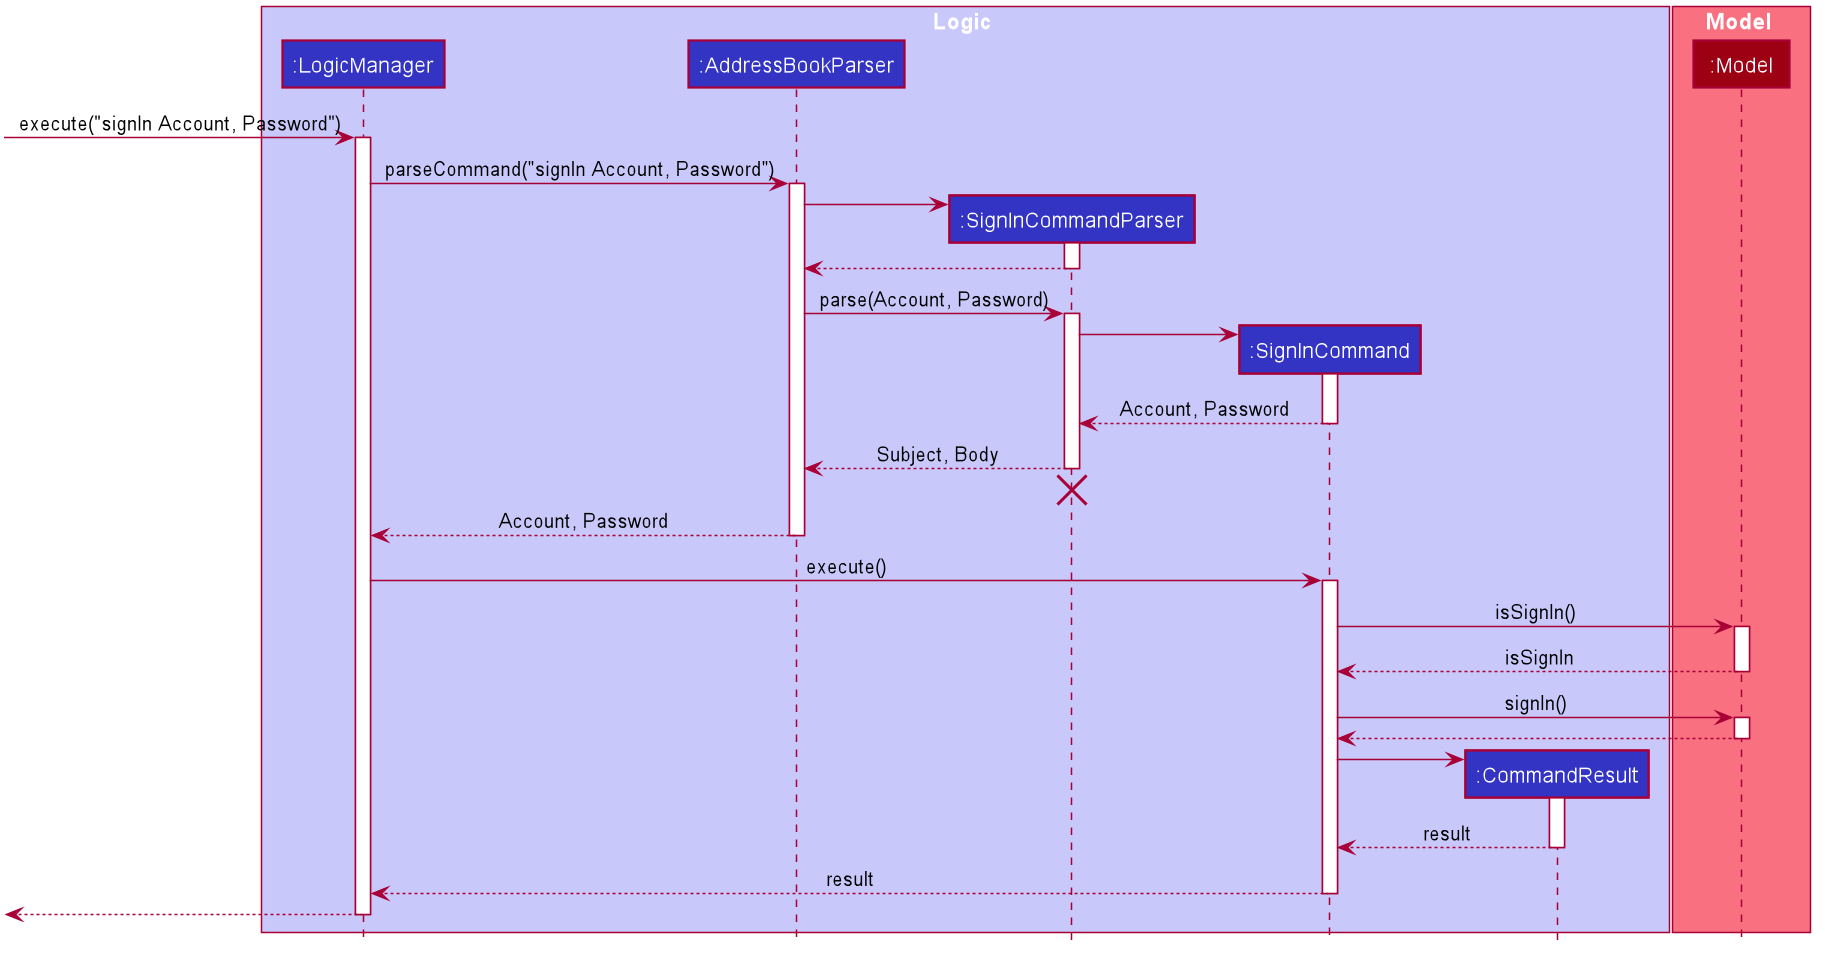
These are the stages shown in figure 15.
-
Parses the input to obtain the Email address and Password.
-
Goes to
Modelto check if user has signed in. -
Creates OwnerAccount with the address and password.
-
Goes to
Modelto store the Email address and Password asOwnerAccount. -
Display the success message.
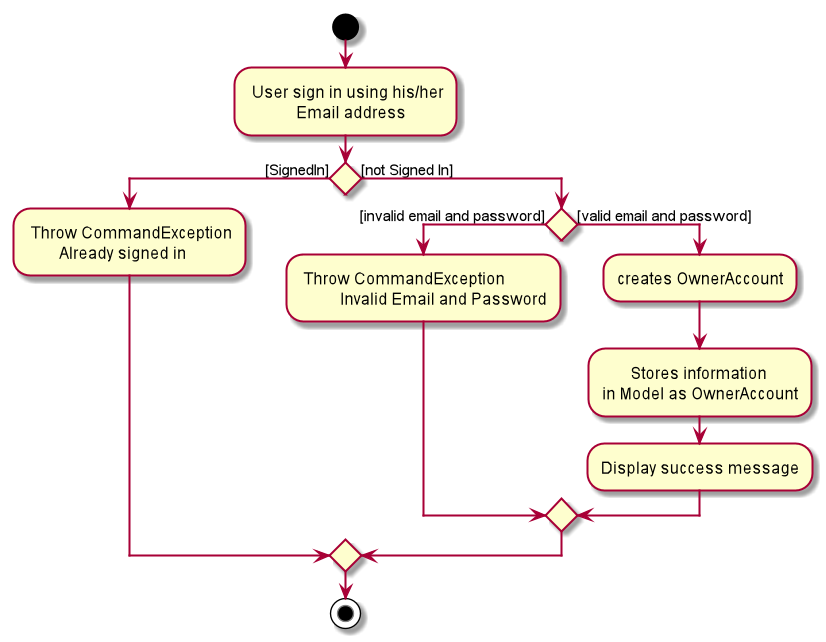
The diagram above shows how signIn works. The command will result in CommandException to be thrown if user has
already signed in with a valid email address (gmail) and password. If the user has not signed in, it will result in CommandException if
either the user’s email address or password is incorrect or does not match. Otherwise, the command will be executed and
the user’s Account information will be stored.
3.7.3. Design considerations
Aspect: Algorithm to check validity of the Account in SignIn commands
-
Alternative 1 (current choice): Sends an email to a dummy email address cs2103t17@gmail.com.
-
Pros: Easy to implement. Do not need to use external libraries which might be time-consuming and difficult to learn.
-
Cons: Takes a while for the method to be executed as it checks whether it can send an email to the address cs2103t17@gmail.com.
-
-
Alternative 2: Use external libraries and utilise more of the javax.Mail API.
-
Pros: Might make the email checking more efficient, thus need only check for the password input.
-
Cons: Would have to use external libraries which will be harder to implement. Only checks for the existence of the email address and does not check for the correctness of the password input.
-
Aspect: Eliminating signIn command
-
Alternative 1 (current choice): Lets user Signs In using their own Gmail Account.
-
Pros: Allows users to user their own Gmail Account and lets members(recipients) know email sent by the team leaders.
-
Cons: Expose users' password when users are trying to sign in. Users will need to change the account security settings to let less secure app access the account. Compromises account security.
-
-
Alternative 2: Hardcode an account in the application that is responsible for all mailing command.
-
Pros: Do not expose users' password and Users do not need to change their Account security settings to send the emails.
-
Cons: Members(recipient) receiving email from the users' may not know the origin of the email. This may lead to confusion for the project’s members.
-
3.8. Timetable input
3.8.1. Description of Feature
This feature is used to input timetable data, which would then be used in the generate command to find a suitable meeting timeslot.
There are two ways to input member’s timetable:
-
Member send a formatted text file to the team leader, which would then be parsed by the system. The file would be a list of newline separated time ranges
-
Member send their NUSMods timetable URL to the team leader, and the system would parse the URL and fetch timetable data using NUSMods API
User command would be in the format: setTimetable INDEX m/member [n/NUSMODS_URL] [f/FILEPATH]
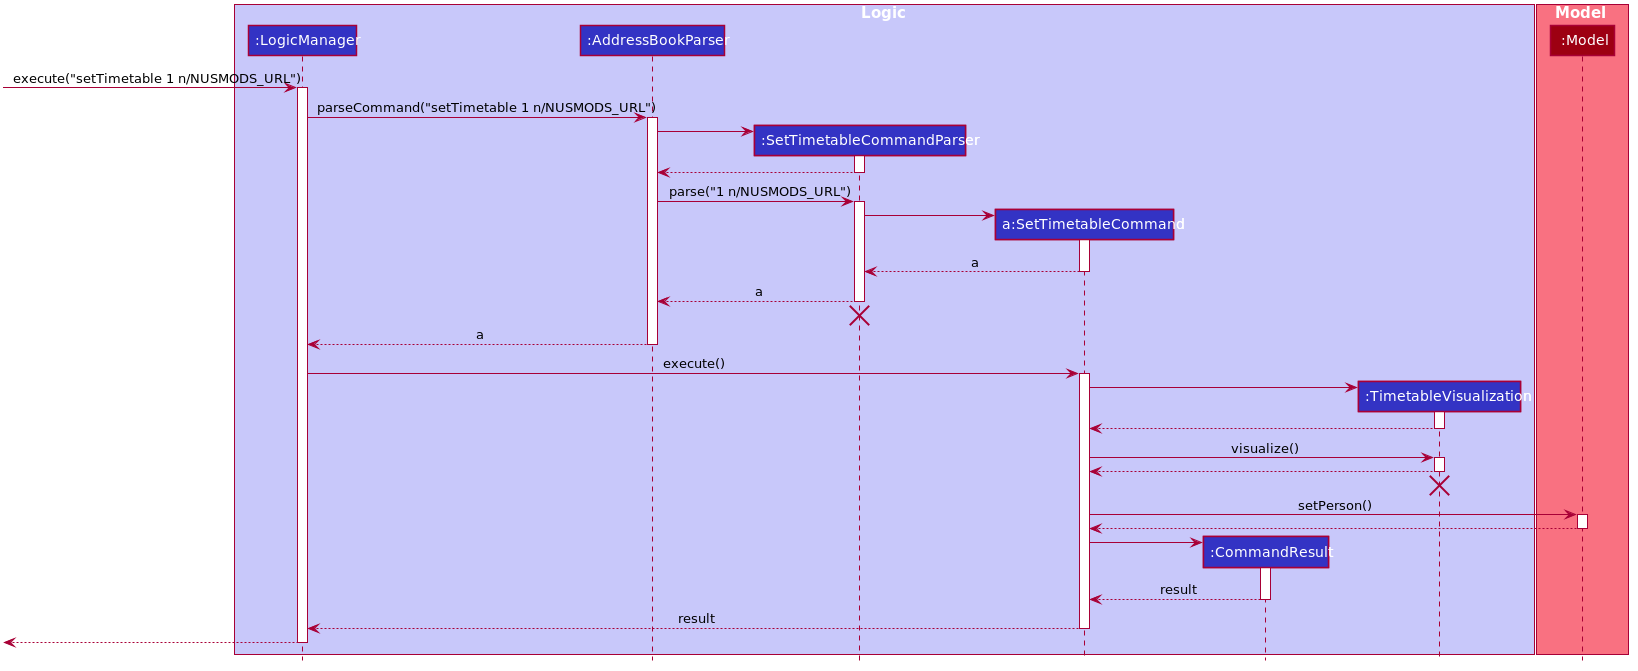
The main logic is implemented within the TimetableInput class, which is invoked by the SetTimetableCommand class.
3.8.2. Details
Important functions in TimetableInput:
-
TimetableInput#getTimetableFromNUSMods(Url url)— Parse URL and fetch timetable data using NUSMods API -
TimetableInput#getTimetableFromFile(String filepath)— Parse file to obtain timetable data
Below is an overview of the classes related to time+table input:
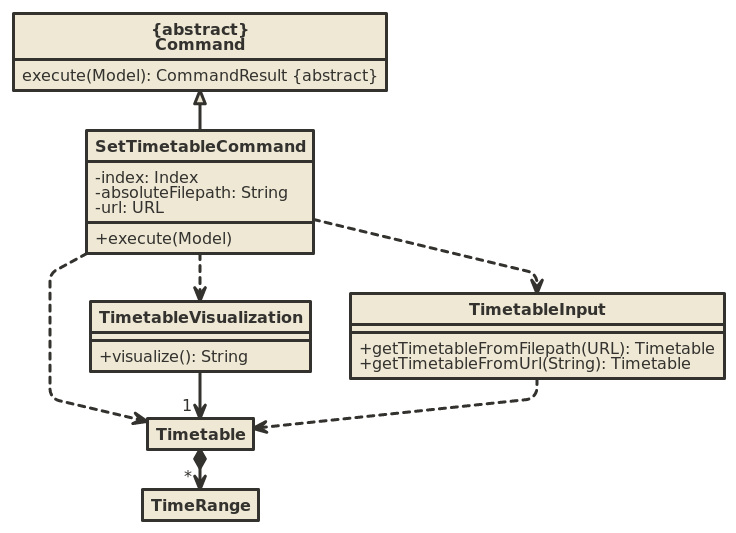
setTimetableCommand accepts either a filepath or a URL, which is then supplied to TimetableInput to fetch the timetable data.
Afterwards, the timetable is passed into TimetableVisualization to provide a visual representation of the set timetable. This visualization is then passed back as a CommandResult to be displayed to the user.
The following sequence diagram illustrates what happens when the user issues the command setTimetable to add their timetable from a shared NUSMods timetable.
3.8.3. Design Considerations
Aspect: How to input timetable
-
Alternative 1 (current choice): Input timetable by importing timetable from an already existing platform.
-
Pros: More practical and convenient for users to input, as opposed to manually typing in all the timetable for every single members.
-
Cons: Feature unreliable as it requires maintainance if the web API changes.
-
-
Alternative 2: Input all time ranges manually by user.
-
Pros: Very reliable due to lack of usage of online APIs.
-
Cons: Very impractical. Most users would not want to enter timetable data of all their members one by one, and would probably skip this feature.
-
We realized that it is very impractical to expect users to input timetable manually all by themselves. No matter how unreliable the web API is, the feature would at least be useful to users. If users have to manually input all the data, we cannot realistically expect this feature to be useful at all.
3.9. Generate meeting timeslot
3.9.1. Description of Feature
The timeslot generator is used to suggest meeting timings by making use of team members' timetable.
This feature makes heavy use of the class TimeRange, which represents a period of time in a week, e.g. MONDAY 1000 — MONDAY 1200.
|
The main logic of this feature is contained within the TimeSlotGenerator class:
3.9.2. Details
TimeSlotGenerator(members, desiredMeetingDuration, restrictedTimeRange)
-
members:List<Timetable>of members of the checked-outProject -
desiredMeetingDuration: How long the meeting would last in hour, expressed as a positive integer -
restrictedTimeRange: Sets the limit of generatedTimeRange, e.g. restrict meeting to working hours, from MONDAY 0900 - MONDAY 1800
Only the two following methods are exposed:
-
TimeSlotGenerator#generate()— Generate timeslot suitable for allTimetablesupplied. Returns a list ofTimeRange, or an empty list ofTimeRangeif no such timeslot is available. -
TimeSlotGenerator#generateWithMostMembers()— Generate timeslot where most members of the currently checked out project are available. Returns a list ofTimeRange.
This feature depends on the timetable stored internally as an attribute of each members:
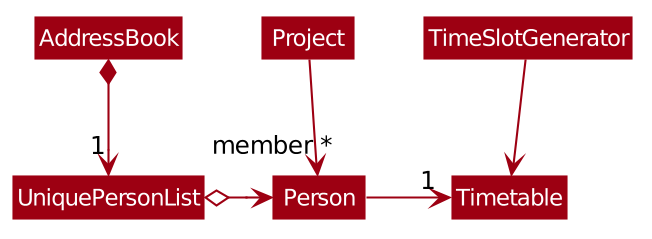
TimeSlotGeneratorTypical usage of TimeSlotGenerator would be look like this:
List<TimeRange> availableTimeSlots = new TimeSlotGenerator(members, desiredMeetingDuration, restrictedTimeRange).generate()
The following sequence diagram shows the entire process of generating timeslot after the command generate d/2 is given:
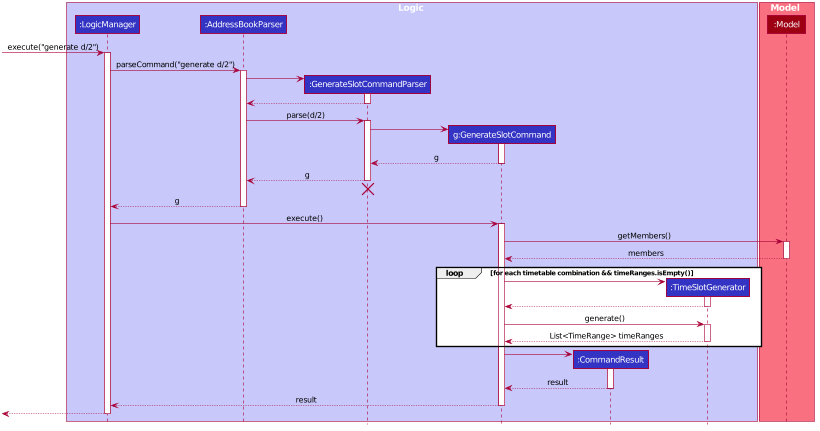
As shown in the sequence diagram above, the command execution would go through the following stages:
-
Fetch the data of members in the current project and pass them to the
TimeSlotGenerator. -
TimeSlotGeneratorwill extract their timetable and generate all possibleTimeRange. -
Display result for the user to view all the possible timeslots that a meeting can be held.
If generate() returns an empty List<TimeRange>, the program should automatically call generateWithMostMembers() and return it as result, informing the user that there is no timeslot where all members are available.
|
The following activity diagram summarizes the general flow of the command generate:
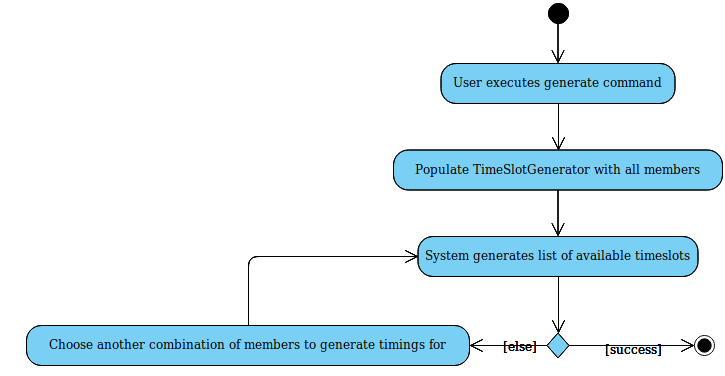
generate command tries to provide best possible meeting timeslot3.9.3. Algorithm Used
TimeSlotGenerator#generate()
-
Combine all the given
Timetableinto a singleList<TimeRange> combined -
combinedis then processed further by merging overlappingTimeRangeinto a singleTimeRange. E.g.TimeRange(MONDAY, 1000, MONDAY, 1200)andTimeRange(MONDAY, 1200, MONDAY,1400)are merged together to form a singleTimeRange(MONDAY, 1000, MONDAY, 1400).List<TimeRange> mergedis then passed on to the next stage. -
mergedis then inverted, and returnsList<TimeRange> invertedcontaining all timeslots where all the members are free. -
invertedis then processed to ensure that allTimeRangefalls withinrestrictedTimeRangespecified by the user, truncating allTimeRangethat extends beyond the specifiedrestrictedTimeRange, returningList<TimeRange> truncated. -
The algorithm then filters
invertedby rejecting allTimeRangethat last shorter thandesiredMeetingDurationspecified by the user. ThisList<TimeRange> acceptedis then passed back to the caller of this method, and the algorithm terminates.
TimeSlotGenerator#generateWithMostMembers()
-
Iterates over all possible combinations of timetables in descending order of number of timetable.
-
For each possible combination, call
TimeSlotGenerator#generate(). -
If
TimeSlotGenerator#generate()returns an empty list, repeat step 2 again. -
Algorithm terminates, returning the combination of List<Timetable> used and available timings
List<TimeRange>wrapped in a classTimeSlotWithMember.
3.9.4. Design Considerations
Aspect: How to generate timeslot with most number of available members
-
Alternative 1 (current choice): Iterate over all possible combinations of timetables, sorted in descending order of number of timetables, and call
TimeSlotGenerator#generate()on each of these combinations.-
Pros: Easy to implement.
-
Cons: May have performance issues in terms of speed. This implementation takes O(2n) time for n members.
-
-
Alternative 2: Use a more sophisticated algorithm to shorten generation duration
-
Pros: Will be much more efficient
-
Cons: Harder to implement, and more specialize towards only doing a single task. Tough to maintain and adapt for other usage.
-
We went with options 1 as there is no real difference in speed if the number of members is restricted to below 15 members, which many projects do not normally exceed. It is much easier to understand and maintain by other developers as well.
3.10. Logging
We are using java.util.logging package for logging. The LogsCenter class is used to manage the logging levels and logging destinations.
-
The logging level can be controlled using the
logLevelsetting in the configuration file (See Section 3.11, “Configuration”) -
The
Loggerfor a class can be obtained usingLogsCenter.getLogger(Class)which will log messages according to the specified logging level -
Currently log messages are output through:
Consoleand to a.logfile.
Logging Levels
-
SEVERE: Critical problem detected which may possibly cause the termination of the application -
WARNING: Can continue, but with caution -
INFO: Information showing the noteworthy actions by the App -
FINE: Details that is not usually noteworthy but may be useful in debugging e.g. print the actual list instead of just its size
3.11. Configuration
Certain properties of the application can be controlled (e.g user prefs file location, logging level) through the configuration file (default: config.json).
3.12. Finance feature
The finance feature allows the user to keep track of the budgets of the project and view them in a graph. The graphs are achieved using JavaFX built in bar and pie chart. The user is also able to store the information in an excel sheet as well. This is done using the Apache POI API. The documentation of this library can be seen at here.
3.12.1. Details
This logic of the feature is based on the the construction of different classes.
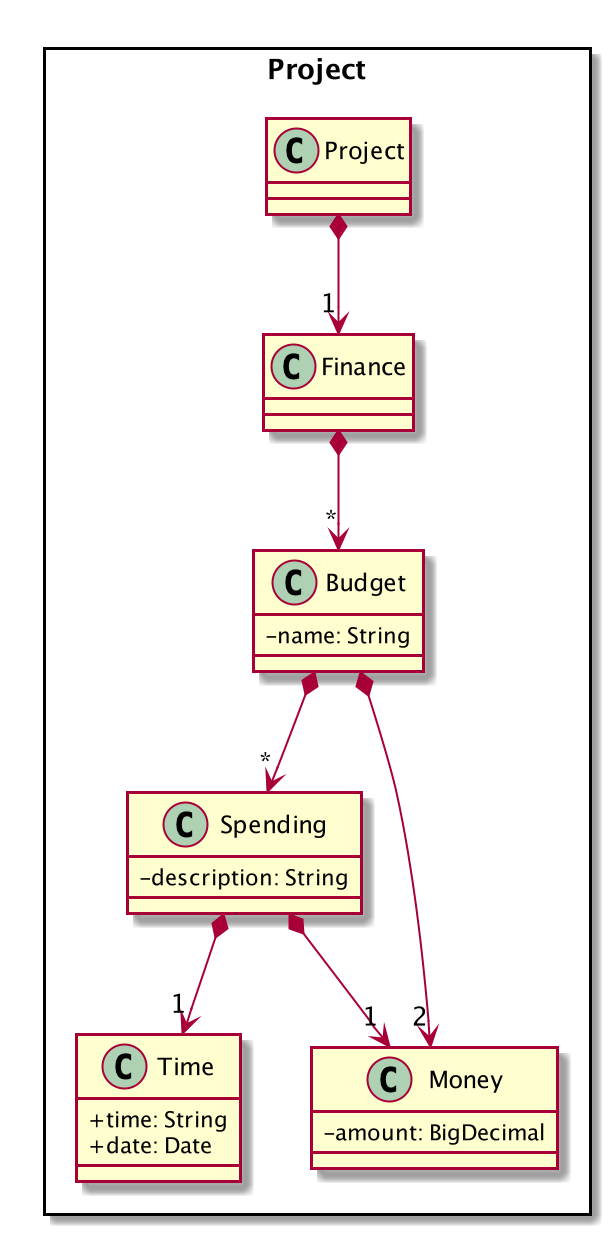
The fact that Budget contains two money object is that it maintains
two attribute amount and remainingAmount as these are usually
the crucial information the user wants to see.
3.12.2. Design considerations
Money is represented as an object. As it is shared by the
Spending class and the Budget class and they all require to
check the validity of a given string to convert it to BigDecimal.
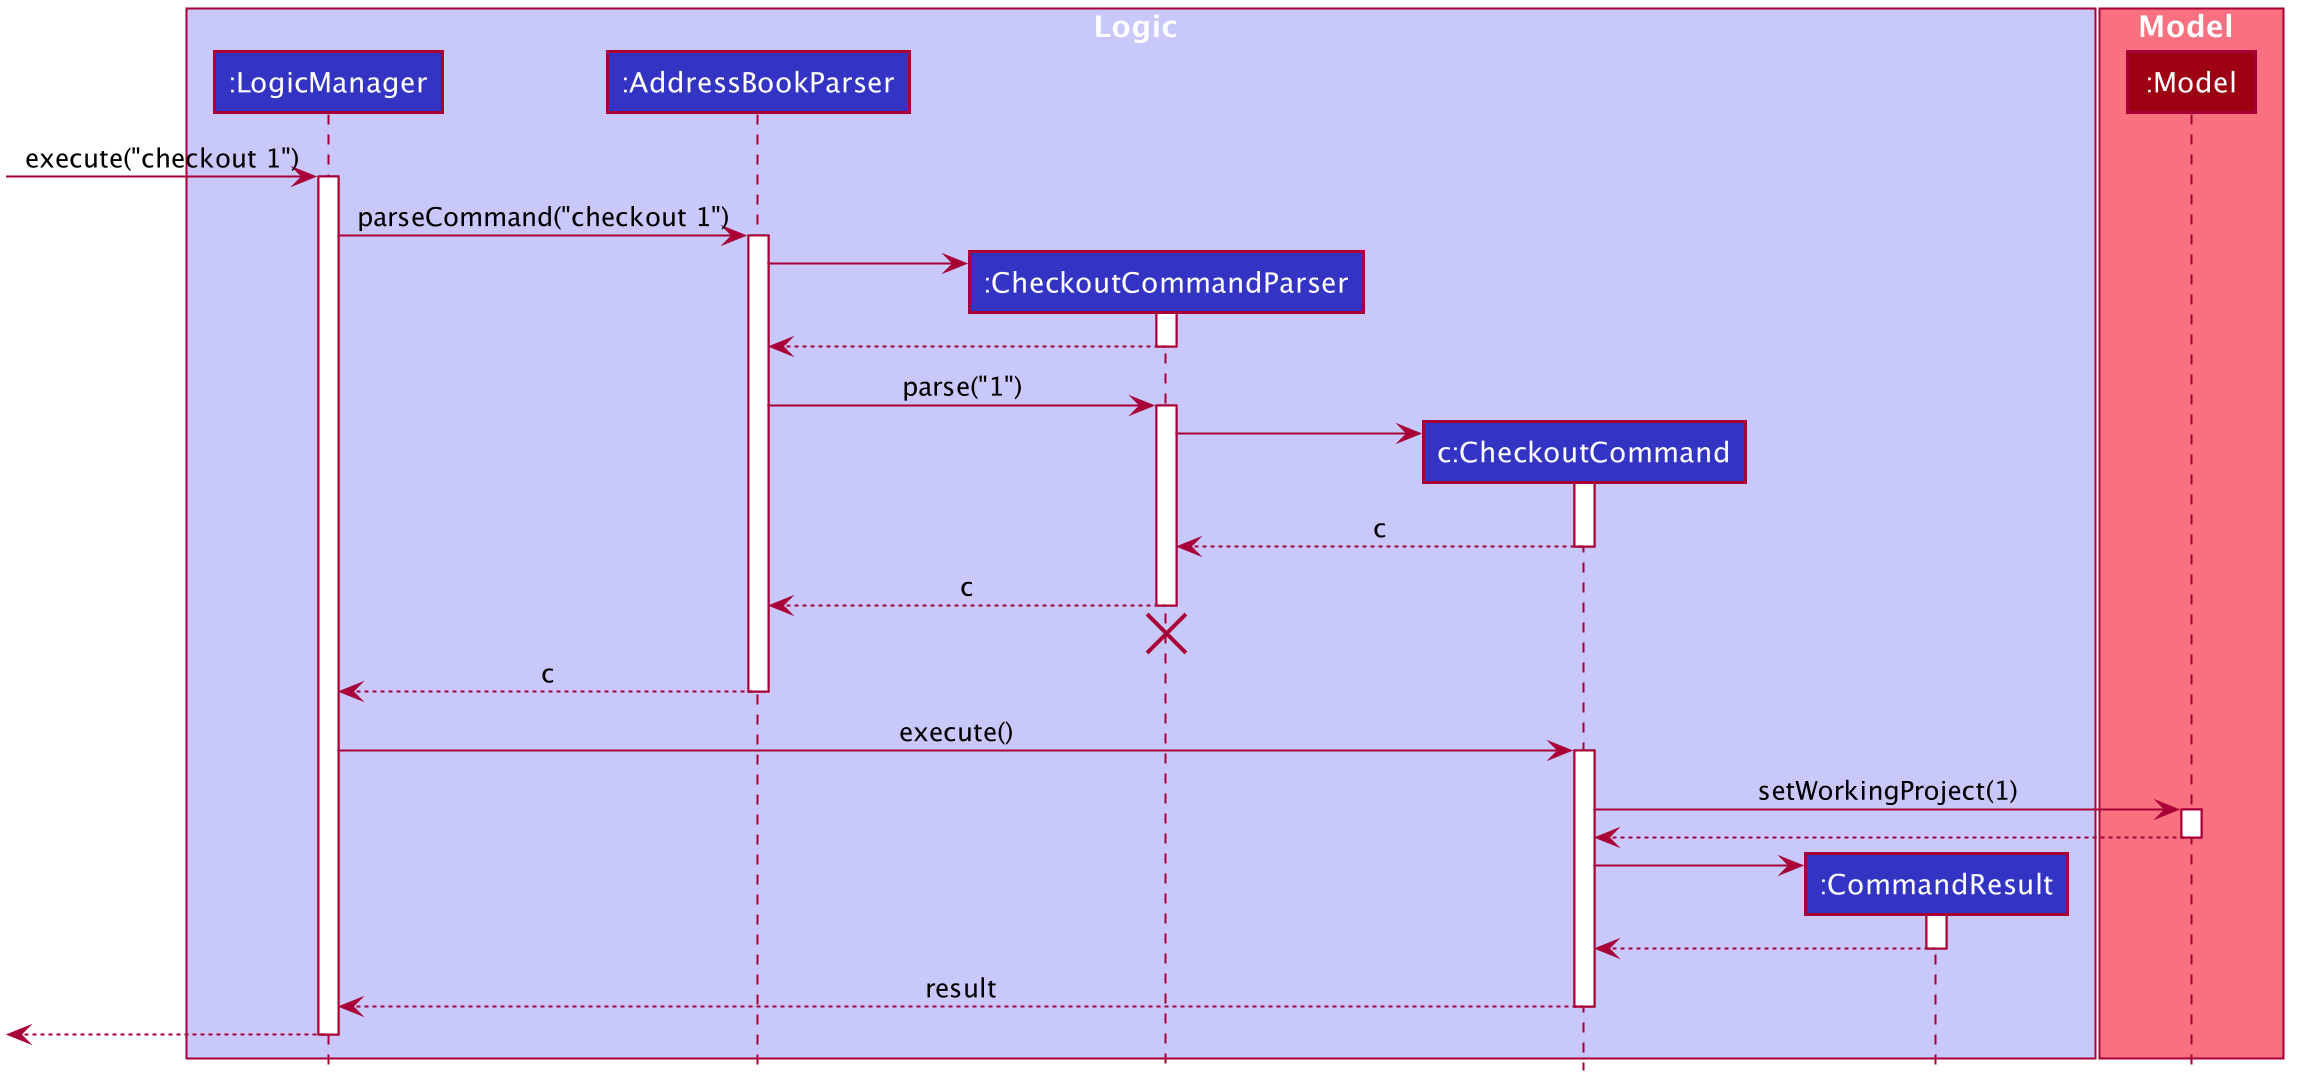
3.13. Checkout
This allows user to checkout to a project from a list of project to work on it. Almost every command regarding the project require the user to checkout first.
For it to work, the ModelManager class is holding an additional Optional<Project>
attribute and the model supports three new methods:
-
setWorkingProject()— Sets the attribute to the argument of the method. -
getWorkingProject()— Returns the current project. -
isCheckedOut()— Checks whether the current working project is empty. -
removeWorkingProject— Sets the attribute toOptional.empty().
A typical use of the command can be seen in the sequence diagram below.
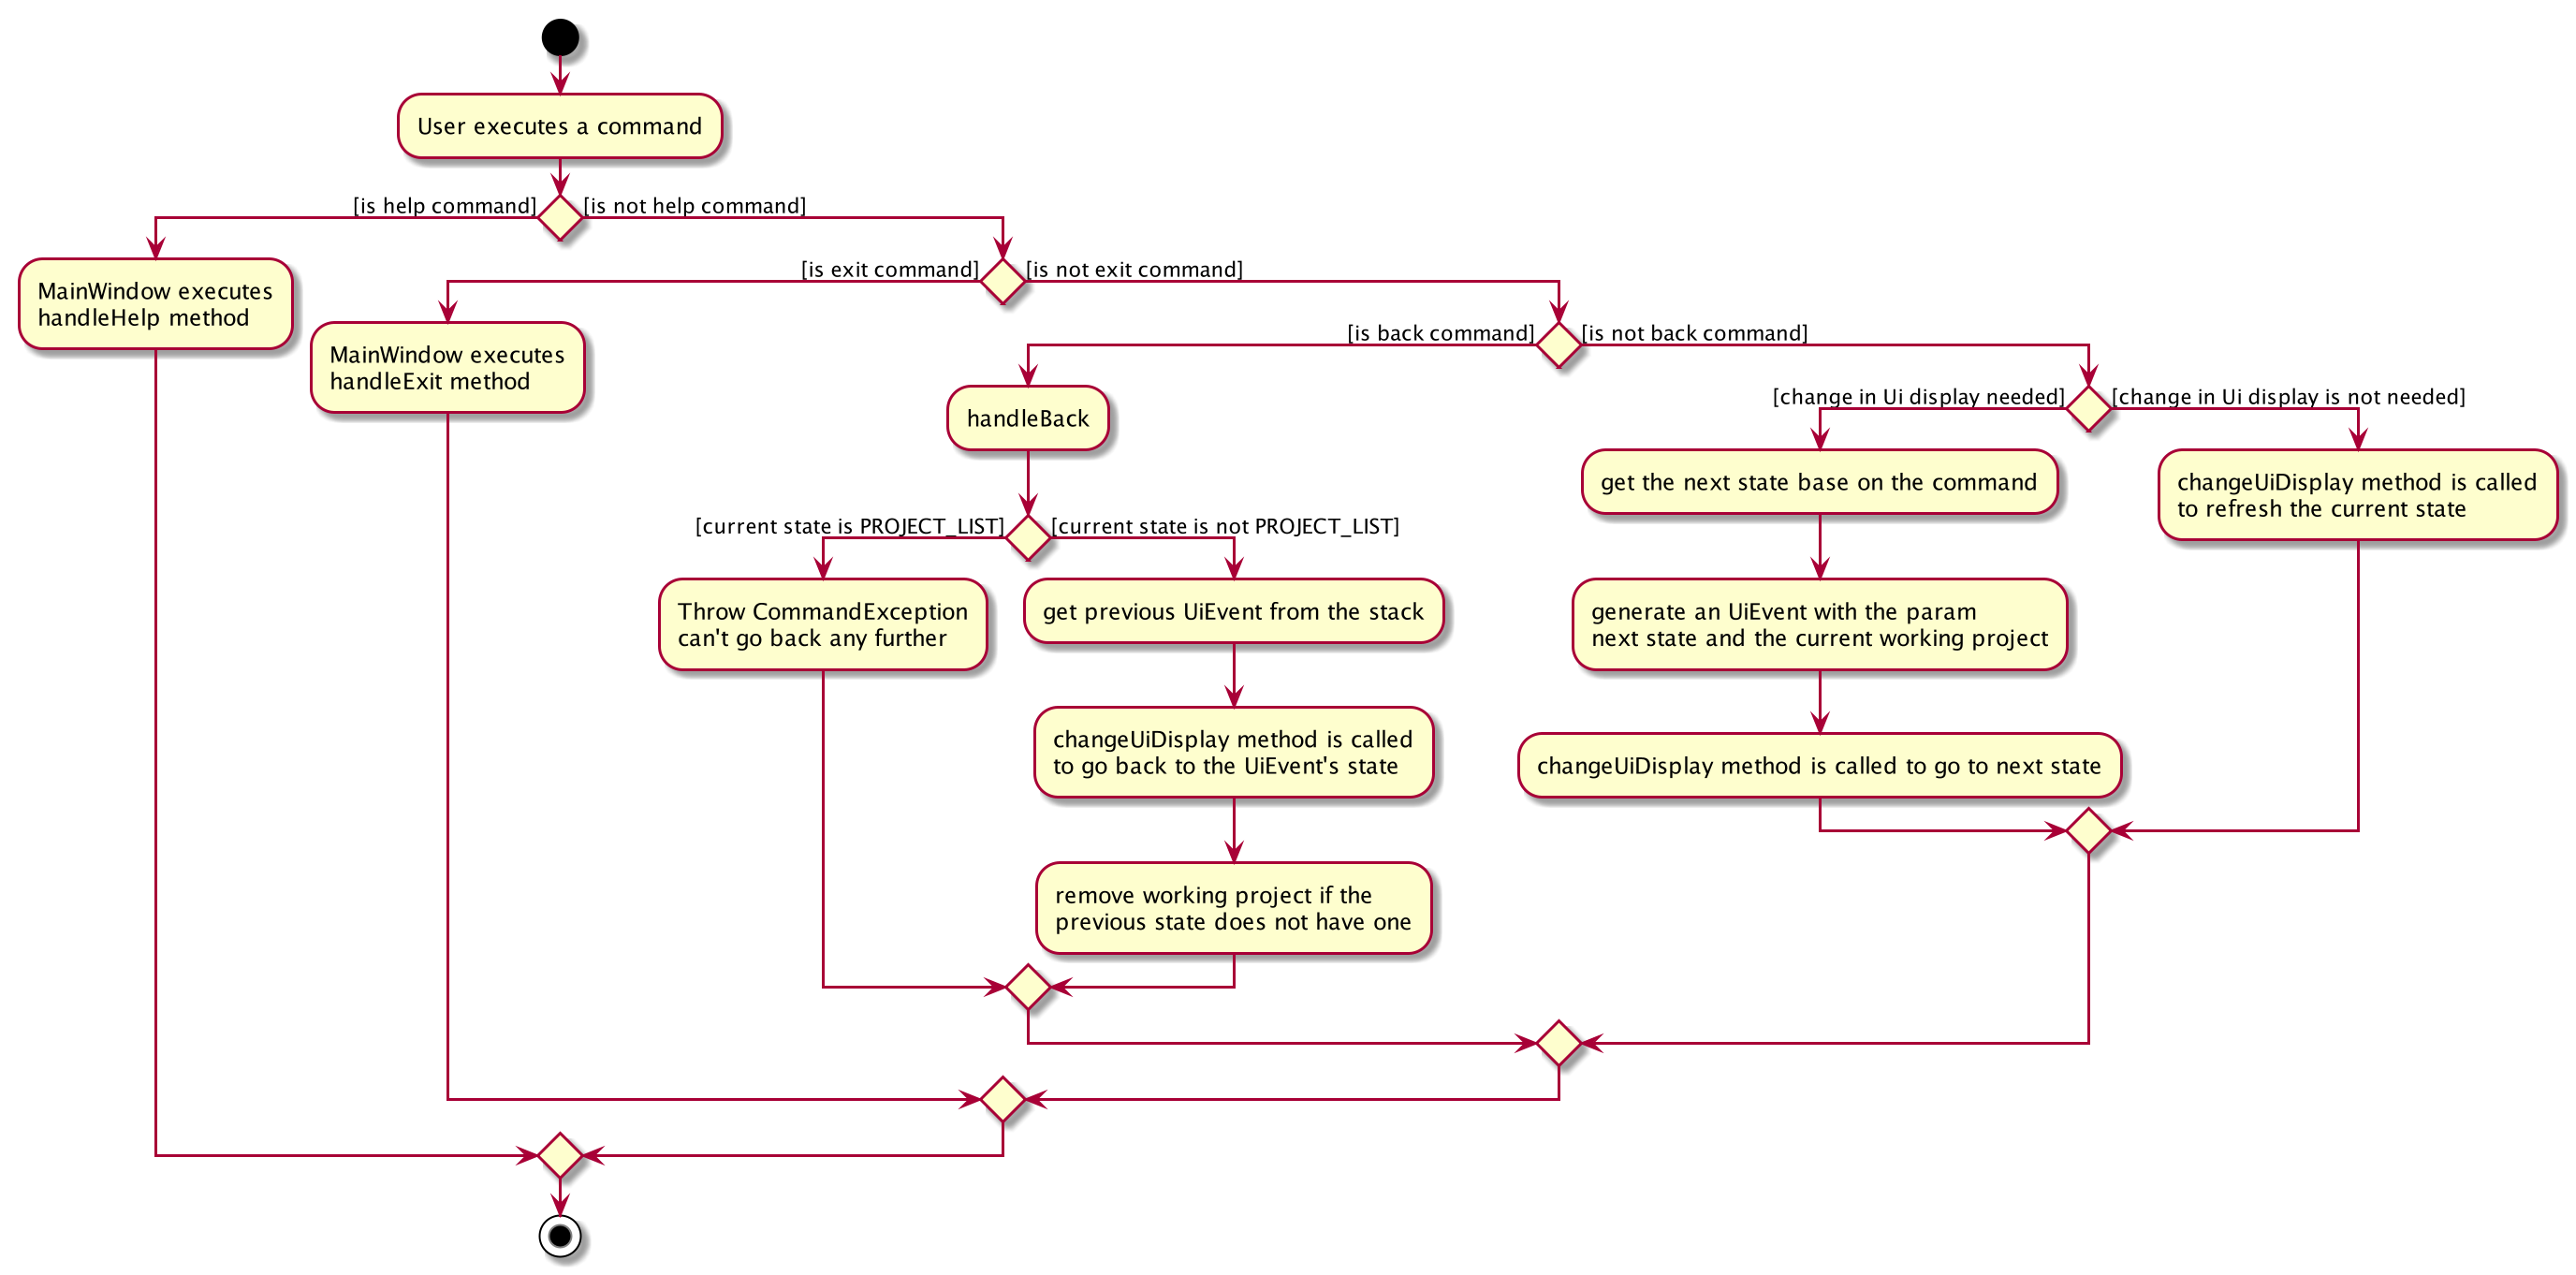
3.14. Change in UI display
The first step of changing UI display is to find out whether a change in UI is needed given a command from user. This is done in the CommandResult class constructor. If a command word matches actions that is email related or help or exit, the flag will indicate that a change in UI is not needed.
Next, a class to represent the state of UI is needed to remember
a history which is the UiEvent class.UiEvent is a class that represent
a type of UiDisplay as an event. It stores the current state of the
application’s UI and the current working project index if it exists.
Whenever a command is executed, a new UiEvent will be generated and stored in history
if this command lead to a state
that is different from the current one.
The viewHistory is stored in the MainWindow class as a stack of UiEvents
and the class also maintains a currentStatePointer. When a back command
is executed, it can check back on what is the previous state.
-
MainWindow#changeUiDisplay— Change the Ui and change the current state. -
MainWindow#getPreviousState— Pops the stack and peek to look for the previous state. -
MainWindow#handleBack— Change the Ui display to the previous state. -
MainWindow#getState— Get the state given a command word.
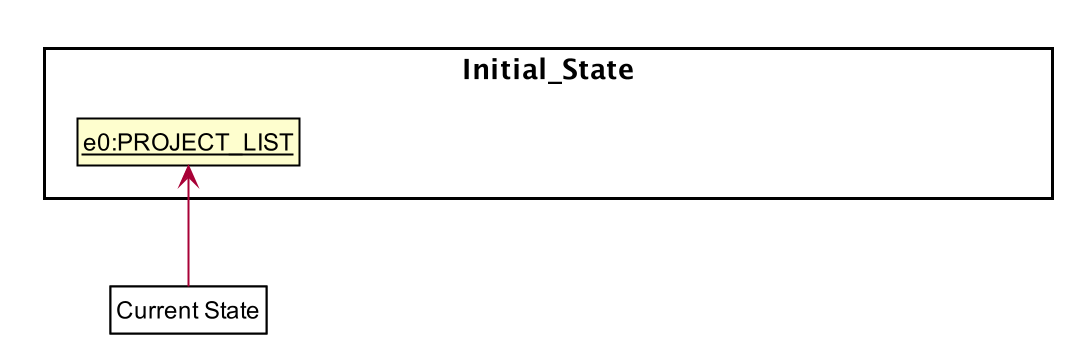
Given below is an example of how the UI behave at each step.
Step 1. The user launches the application and the viewHistory will be initialized with the
PROJECT_LIST state. The currentStatePointer is currently pointing to
that single address book state.
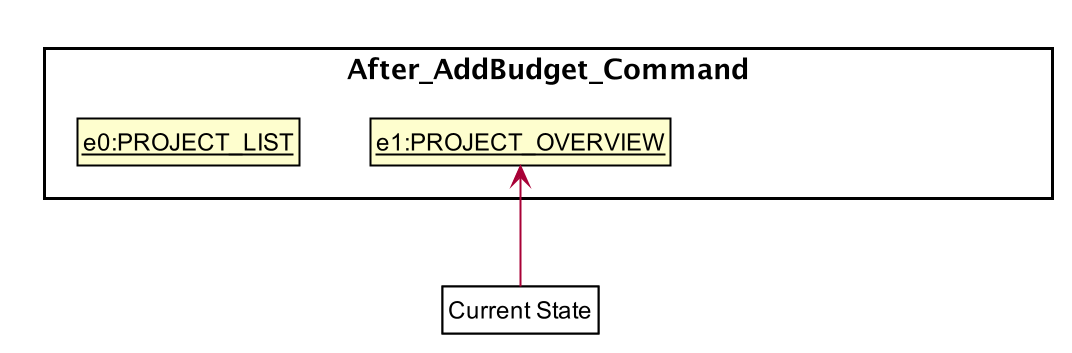
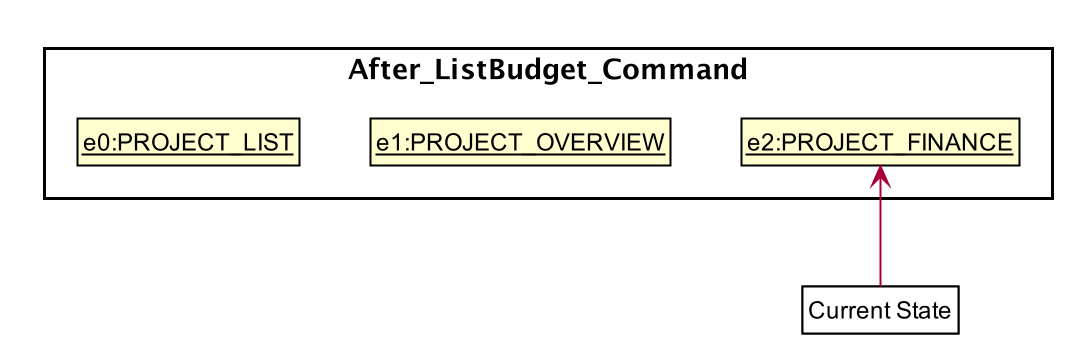
Step 2. The user executes checkout 1 command to checkout to project 1 to work on.
During the execution of the checkout command, when commandresult is created,
it detects that there is a need to change the Ui and the flag is made to true.
In the MainWindow, since a change is needed, MainWindow#changeUiDisplay is called
to change the display to PROJECT_OVERVIEW which is found out using
the MainWindow#getState method. It also set the currentState to be PROJECT_OVERVIEW.
The UiEvent with the state of PROJECT_LIST and an empty index will be stored
in the viewHistory stack.

Step 3. The user now decide to add a budget by addBudget b/ equipment 3000.00.
This command does need a change in Ui display but the state of this command
is exactly the same as the previous command thus MainWindow#changeUiDisplay
will be called with the same state.
Thus, the method MainWindow#changeUiDisplay is still called but this time
it is called to update the information in the current display and set the
current state to be still the current state. Thus, the currentStatePointer does
not move.
If a command fails its execution, a commandResult wont be generated thus no change in Ui will happen.
|
Step 4. The user now wants to have a better view of the budgets and executes
listBudget. Same step follows through the checkout command.
Step 5. The user now decides to go back to the home page and executes
two consecutive back command. At the execute stage in MainWindow,
it detects it is a back command and MainWindow#handleBack is called.
This method will then pop the current state by MainWindow#getPreviousState
and call MainWindow#changeUiDisplay to display the previous Ui.

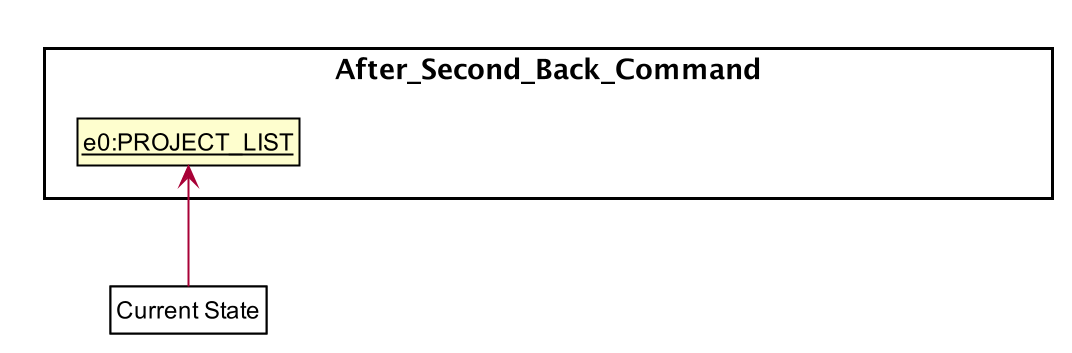
If the currentStatePointer is at PROJECT_LIST, then there are
no previous UI states to go back. Under such situation, an error will be returned.
|
3.15. Performance Tracking
We allow users to be able to track the performance of every member in the project, by using information that the user has already input into MyProject.
3.15.1. Implementation
The Performance of each Person is consolidated and stored in a PerformanceOverview object inside the model.
Performance of a Person stores the information such as tasks assigned to the person, which are specific to the person. The actual performance
of the person can only be calculated in PerformanceOverview with information from the Project as well.
|
PerformanceOverview is a separate model we have implemented, which consolidates all the data from each Person involved
in the specific project, as well as from the project itself. The following is a class diagram for PerformanceOverview.
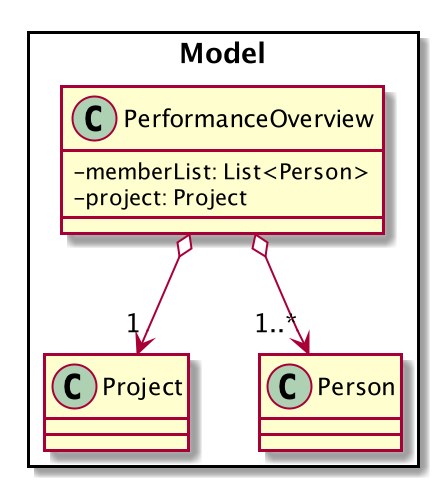
A typical PerformanceOverview is created using the following constructor:
PerformanceOverview(project, memberList)
-
project- This is theProjectthat the user is concerned about. -
memberList- This is theList<Person>which consists of all thePerson(s) involved with this project. Note that they each have their ownPerformanceas well.
All the calculations of the various components constituting the performance of an individual is calculated within the PerformanceOverview,
and the results are accessed using each of the following commands:
-
PerformanceOverview#getAttendanceOf(Person person)- Gets the number of meetings attended by thePerson -
PerformanceOverview#getRateOfAttendanceOf(Person person)- Gets the percentage of meetings attended by thePerson -
PerformanceOverview#getNumOfTaskDoneOf(Person person)- Gets the number of tasks completed by thisPerson -
PerformanceOverview#getTaskCompletionRateOf(Person person)- Gets the percentage of the assigned tasks, which thePersoncompleted
Internally, every attribute of the performance of an individual a HashMap for that particular attribute. For example, the task completion
rate of every individual is stored in a HashMap<String, RateOfTaskCompletion> where the key is the string of the name of the member, while
the value is the rate of task completion. Every other attribute is stored in similar fashion.
Next, we will demonstrate the process of using this feature to see the performance of each member. The following sequence diagram
shows the entire process of calculating the performance of member and showing it, after the showPerformanceOverview command
is input by the user.
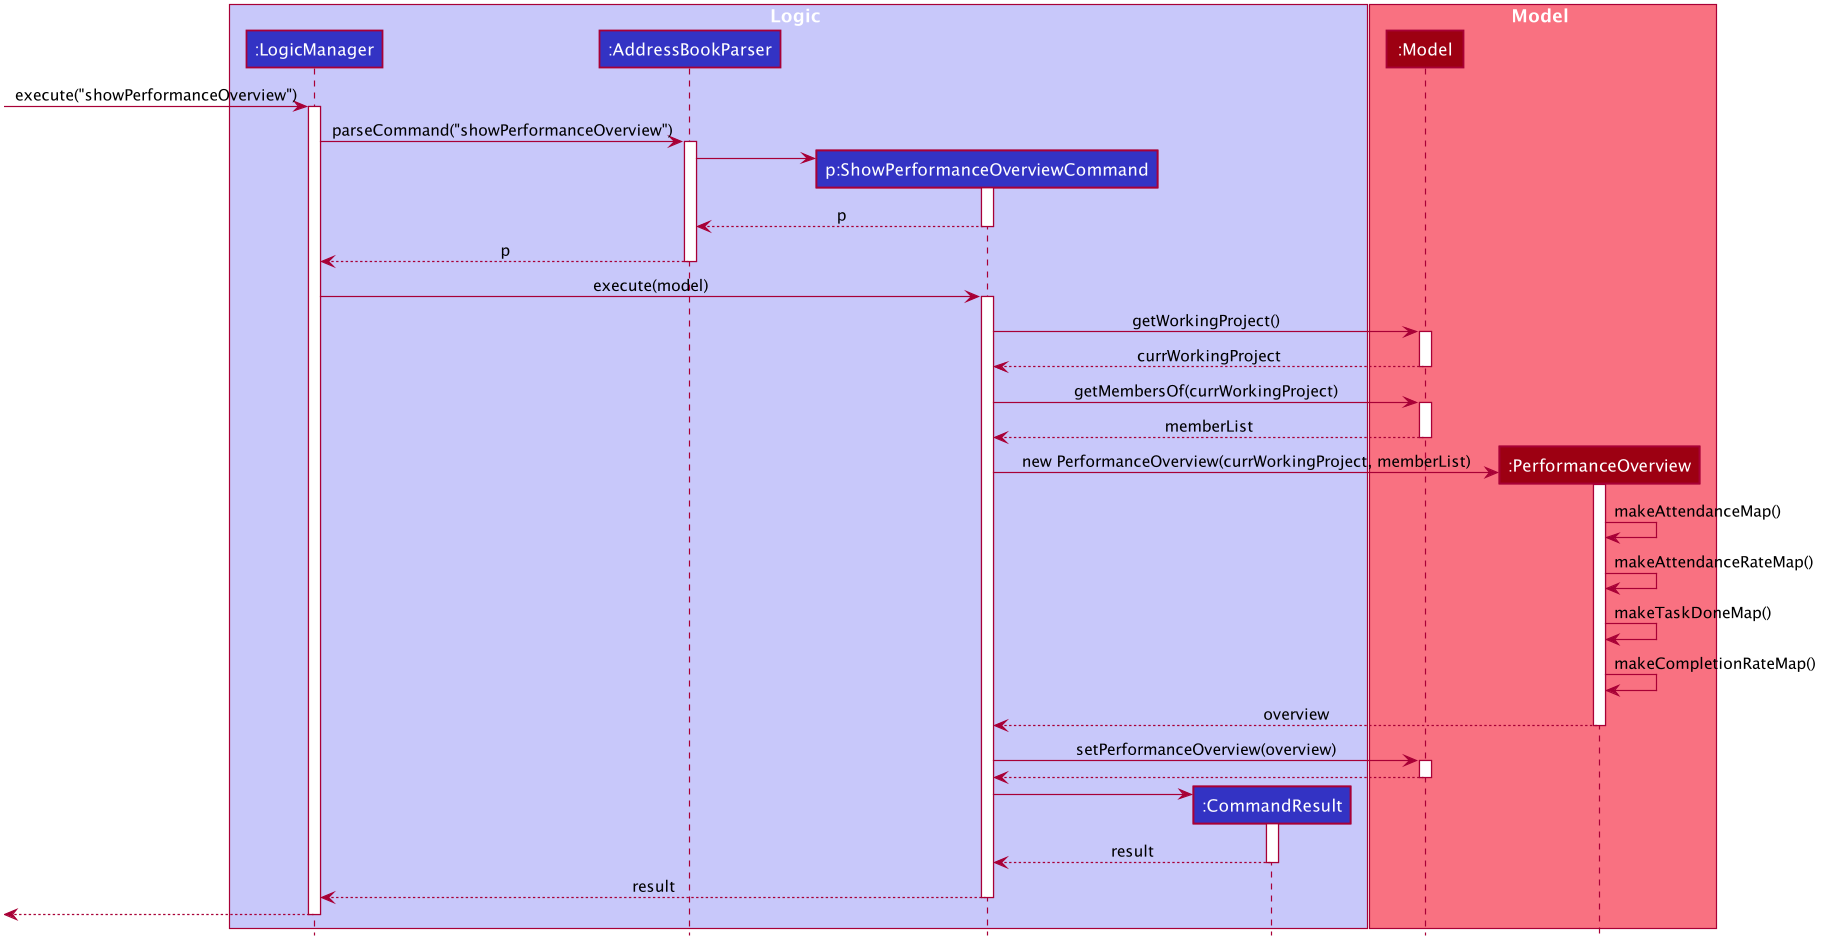
showPerformanceOverview command executionWith reference to the sequence diagram above, here are the steps of the command execution:
Step 1. The user input is parsed, and a ShowPerformanceOverviewCommand is created.
Step 2. The execution of the ShowPerformanceOverviewCommand fetches the Project that the user is working on, and also
the Person(s) involved in the project and returns them as a List<Person>.
Step 3. The List<Person> and Project are used to create the PerformanceOverview. Here you can see that when a PerformanceOverview is created
there are 4 methods being called internally. This is where all the necessary information is taken from the project and members, and used to
calculate the different attributes of the member’s performance. It is also in those 4 methods, where the HashMaps are created.
Step 4. The PerformanceOverview is set in the Model, and displayed to the user subsequently.
The following activity diagram summarizes the general flow of the execution of the showPerformanceOverview command:
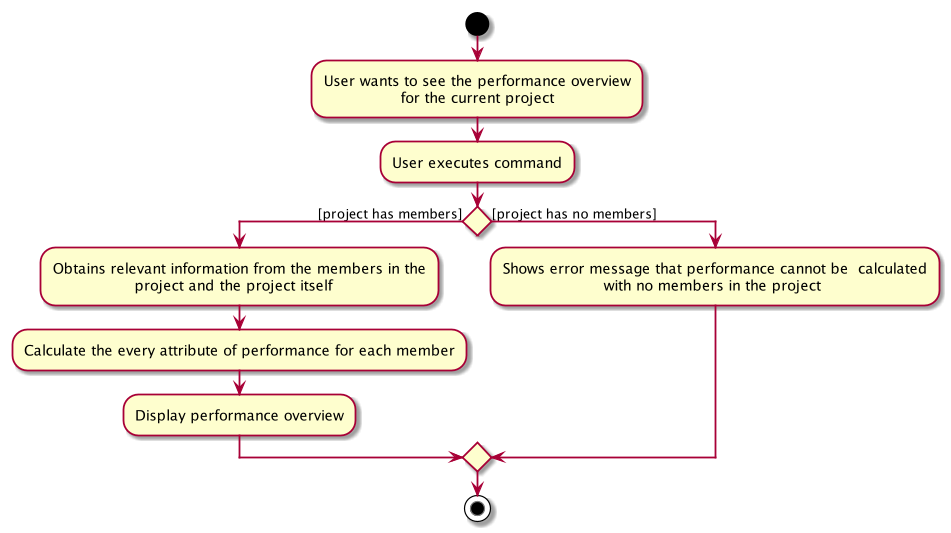
showPerformanceOverviewAs shown in the activity diagram, there are only 2 main flows during the execution of this command. If there are members in the project, the performance of the members can be calculated, and the performance overview will be displayed to the user. If there are no members in the project, the user will be shown an error message to tell them that the performance overview cannot be computed.
3.15.2. Design Considerations
Data structure of PerformanceOverview
-
Alternative 1(Current implementation): Currently, every attribute is stored and paired to the member using a HashMap. The key is the string representation of the name of the members, and the value is the attribute itself.
-
Pros:
-
Easy to implement.
-
In order to add a new attribute to measure performance, there is only a need to add a new HashMap, a method to calculate the values, and a method to retrieve the values.
-
-
Cons:
-
It is more difficult to iterate through all HashMaps to retrieve the values based on your preferred ordering.
-
-
4. Documentation
Refer to the guide here.
5. Testing
Refer to the guide here.
6. Dev Ops
Refer to the guide here.
Appendix A: Product Scope
Target user profile:
-
university students (will be expanded to working adults as well in future versions)
-
handles many different projects at once
-
unable to keep track of tasks and deadlines
-
loves visual aids such as charts and graphs to display information
-
needs a single app to store all kinds of different information
-
has a need to manage a significant number of contacts
-
prefer desktop apps over other types
-
can type fast
-
prefers typing over mouse input
-
is reasonably comfortable using CLI apps
Value proposition: One stop project management app to store and display different projects with user-friendly commands using a command line interface.
Appendix B: User Stories
Priorities: High (must have) - * * *, Medium (nice to have) - * *, Low (unlikely to have) - *
| Priority | As a … | I want to … | So that I can… |
|---|---|---|---|
|
Team Manager |
give my projects names |
uniquely identify all my different projects |
|
Team Manager |
store ongoing tasks for each project |
conveniently delegate and manage the tasks that need to be done for each project |
|
Team Manager |
prioritise the tasks within a project |
easily manage the progress of my project |
|
Team Manager |
assign a status to a task |
keep track of which tasks are done and which are still ongoing |
|
Team Manager |
allocate tasks to my members and store this information |
conveniently delegate tasks and ensure there are no overlaps |
|
Team Manager |
easily get an overview of what my members are currently doing |
so that I know which member is responsible for which tasks within the project |
|
Team Manager |
be able to remind my members of upcoming meetings |
ensure smoother team meetings as they are updated on the time and location, and there would be no unnecessary delays |
|
Team Manager |
backup my save file |
|
|
Team Manager |
which members must be at a particular meeting |
schedule a meeting even if there are no dates where every member is available |
|
Team Manager |
get a list of possible dates with attendance of each members |
choose the optimal date with more relevant members |
|
Team Manager |
set a range of timings where meetings can be set |
schedule meetings at timings customised to my own requirements |
|
Team Manager |
track the project’s expenditure |
ensure that the budget for the project will not be exceeded |
|
Team Manager |
sort tasks based on deadlines and show the list |
know which are the tasks that are to be completed as soon as possible |
|
team manager |
access the list of valid commands that I can use |
|
|
Team Manager |
find an optimal meeting location based on each team members' location |
optimise the convenience of the team meeting locations for each team member |
|
Team Manager |
remind members of their deadlines for their allocated tasks |
make sure the tasks are completed promptly |
|
Team Manager |
find a date that everyone is free for team meetings |
|
|
Team Manager |
categorise the projects based on my preferences |
better organise the projects |
|
Team Manager |
set an agenda for meetings |
I can avoid meetings that are unproductive due to lack of things to do |
|
Team Manager |
send standardised emails to every team member containing the most updated project details |
keep all my members up to date with the latest information when needed |
|
Team Manager |
send the minutes from a meeting to each member |
keep each member updated on what was discussed during the meeting |
|
Team Manager |
change the theme of the application |
make it look the way I want it to |
|
Team Manager |
be recommended locations which are conducive for the meetings |
|
|
Team Manager |
export a project as a word document |
use it easily with other third party applications as needed |
Appendix C: Use Cases
Use case: UC01 - Add a project
MSS
-
User requests to add a project.
-
MyProject adds the project with respect to the arguments passed in by user. Use case ends.
Extensions
-
2a. The arguments passed in are incomplete/wrong.
-
2a1. MyProject shows an error message. Use case resumes at step 1.
-
Use case: UC02 - Checkout to a project to work on
MSS
-
User requests to list projects.
-
MyProject shows a list of projects.
-
User requests to switch to a project in the list to work on.
-
MyProject switches to the project for the user. Use case ends.
Extensions
-
2a. The list is empty. Use case ends.
-
3a. The given index is invalid.
-
3a1. MyProject shows an error message. Use case resumes at step 2.
-
Use case: UC03 - Edit a project
MSS
-
User checkout to a project(UC02).
-
User requests to edit current project.
-
MyProject requests for details of change.
-
User enters the requested details.
-
MyProject edits the details of the project and displays the information of the edited project. Use case ends.
Extensions
-
3a. The given details do not match the given format.
-
3a1. MyProject requests for the data and displays the format to be input.
-
3a2. User enters new data. Steps 3a1-3a2 are repeated until the data entered are correct. Use case resumes from step 4.
-
Use case: UC04 - Edit a member
MSS
-
User checkout to a project(UC02).
-
User requests a list of members.
-
MyProject shows a list members in this project.
-
User chooses a member to edit based on the index and uses the corresponding prefix to change the desired attribute.
-
MyProject makes the changes and displays the member with the updated attributes. Use case ends.
Extensions
-
3a. The given index is invalid.
-
3a1. MyProject shows an error message. Use case ends.
-
-
3b. The prefix used does not match any of the predefined prefixes.
-
3b1. MyProject shows an error message. Use case ends.
-
Use case: UC05 - Send reminder
Preconditions: User has the e-mail addresses of all the team members, user has an email account and team members has the e-mail address of the user.
MSS
-
User checkout to a project(UC02).
-
User selects the uncompleted tasks in the project.
-
User sends reminder to the members in charge of the tasks to complete by the specified deadline.
-
Team members reply for acknowledgement.
-
User receives acknowledgement. Use case ends.
Extension
-
3a. All the tasks in the project has been completed.
-
3a1. User requests for for availability for the next meeting time. Use case ends.
-
-
5a. Team members do not receive the reminder e-mail.
-
5a1. User does not receive acknowledgement reply.
-
5a2. User resend the reminders to team members who do not reply. Use case resumes from step 6.
-
Use case: UC06 - Store team members’ availability
MSS
-
Team members send user their respective timetable as a text file.
-
User checkout to a project(UC02).
-
Team leader stores timetable for the respective team member. Steps 1 - 2 are repeated for each team member, until all team members’ timetables are stored. Use case ends.
Extensions
-
2a. Text file invalid.
-
2a1. MyProject prompts team leader that given file is invalid.
-
2a2. Team leader requests for resubmission of timetable from team member. Use case resumes from step 2.
-
Use case: UC07 - Generate time slot where all team members are available for meeting
MSS
-
User stores all team members’ availability (UC06).
-
Team leader request for a meeting within a specific range of time.
-
MyProject displays a time frame where all team members are available. Use case ends.
Extensions
-
2a. No time slot exists such that all team members are available. Use case ends.
Appendix D: Non Functional Requirements
-
Should work on any mainstream OS as long as it has Java
11or above installed. -
Should be able to hold up to 1000 persons without a noticeable sluggishness in performance for typical usage.
-
A user with above average typing speed for regular English text (i.e. not code, not system admin commands) should be able to accomplish most of the tasks faster using commands than using the mouse.
{More to be added}
Appendix F: Product Survey
Product Name
Author: …
Pros:
-
…
-
…
Cons:
-
…
-
…
Appendix G: Instructions for Manual Testing
Given below are instructions to test the app manually.
| These instructions only provide a starting point for testers to work on; testers are expected to do more exploratory testing. |
G.1. Launch and Shutdown
-
Initial launch
-
Download the jar file and copy into an empty folder
-
Double-click the jar file
Expected: Shows the GUI with a set of sample projects. The window size may not be optimum.
-
-
Saving window preferences
-
Resize the window to an optimum size. Move the window to a different location. Close the window.
-
Re-launch the app by double-clicking the jar file.
Expected: The most recent window size and location is retained.
-
G.2. Deleting a person
-
Deleting a person while all persons are listed
-
Prerequisites: List all persons using the
listcommand. Multiple persons in the list. -
Test case:
delete 1
Expected: First contact is deleted from the list. Details of the deleted contact shown in the status message. Timestamp in the status bar is updated. -
Test case:
delete 0
Expected: No person is deleted. Error details shown in the status message. Status bar remains the same. -
Other incorrect delete commands to try:
delete,delete x(where x is larger than the list size) {give more}
Expected: Similar to previous.
-
G.3. Sending Reminders
-
Prerequisites: Checkout to a project using the checkout command. Sign in using the Gmail Account using the signIn command.
-
Command input: sendReminder d/0
Expected output: no reminders are sent as the duration is 0, no meetings or tasks are due in 0 days. -
Command input: sendReminder d/-1
Expected output: no reminders are sent as the duration cannot be a negative number. -
Other incorrect sendReminder commands to try: sendReminder d/hello (where duration is an alphabet), sendReminder d/0.9 ( duration can only take numeric character whereas 0.9 contains "."), sendReminder d/ (duration cannot be empty)
G.4. Broadcasting Email
-
Prerequisites: Checkout to a project using the checkout command. Sign in using the Gmail Account using the signIn command.
-
Command input: broadcastMail su/ me/
Expected output: An email with empty Header and empty Message body will be sent to all members in the project. -
Command input: broadcastMail su/0.%$&89 me/lkjhsd
Expected output: An email with header "0.%$&89" and message body "lkjhsd" will be sent to all members in the project. -
There is no incorrect broadcastMail commands as the header and the message body can be anything that the user likes.
G.5. Signing In
-
Prerequisites: Enable access to less secure app in the Google Account security settings. Disable the two-step verification method in the Google Account security settings. Use google account email address.
-
Command input: signIn ac/hello@yahoo.com pa/12345678
Expected output: failed to sign in as the input would expect a gmail domain to be keyed in. -
Command input: signIn ac/hello hello pa/123213
Expected output: failed to sign in as the email address keyed in is not in the correct email format. -
Command input signIn ac/ pa/ Expected output: failed to sign in as an empty email address is not a valid format for an email address.
-
Other incorrect commands for signIn: signIn ac/cs2103t17@gmail.com pa/ (failed to sign in as the password for the email address is wrong) signIn ac/111111 pa/111111 (failed to sign in due to invalid format for email address)
G.6. Editing a task
-
Prerequisities: Checkout to a project using the
checkoutcommand. Multiple tasks in the task list. -
Test case:
editTask 1 d/
Expected: First task is marked as done(cross changes to a tick). -
Test case:
editTask 2 s/Do parts of the parser
Expected: The description of the second task is edited. Since d/ is not included in the input, the task is unchecked. -
Test case
editTask 3 d/
Expected: No task is edited. Error details shown in the status message. -
Other incorrect editTask commands to try:
editTask x(where x is negative or larger than the list size),editTask c/1/1/2019 1500(Wrong time format)
G.7. Sorting a task
-
Prerequisites: Checkout to a project using the
checkoutcommand. Multiple tasks in the task list sorted according to the default order of increasing time(index 2). -
Test case:
sortTask 4
Expected: Tasks will automatically be sorted by which tasks are done/not done and then by increasing order of time. -
Test:
sortTask 1Expected: Tasks will automatically be sorted by alphabetical. -
Test: `addTask c/05/05/2019 1200 s/Allocate roles Expected: Task will be added to the first index as the list is sorted by alphabetical order and 'Allocate roles' has the highest priority.
-
Incorrect sortTask commands to try:
sortTask x(where x is not within the range mentioned which is between integers 1-4)
G.8. Adding a member from contacts
-
Prerequisites: Checkout to a project using the
checkoutcommand. You also need to have multiplePerson(s) in your contacts. -
Test case:
addFromContacts 1
Expected: First person in your contacts is added your your project. -
Test case:
addFromContacts 2 3
Expected: Adds both the second and third person into your project. -
Test case:
addFromContacts 2000Expected: No members are added, error message is shown saying the index is invalid. -
Other incorrect addFromContacts commands to try:
addFromContacts(this is an incorrect format since no index is specified)
addFromContacts -1(This is an invalid format since index should be positive)
G.9. Assigning a task to members
-
Prerequisites: Checkout to a project using the
checkoutcommand. There are one or more tasks in your project. There are one or more members in your project. -
Test case:
assignTask 1 1
Expected: First task listed in the project is assigned to the first person listed in the project as a member. -
Test case:
assignTask 1 2 3
Expected: First task listed in the project is assigned to both the second and third person listed in the project. -
Test case:
assignTask
Expected: No tasks are assigned and error message for invalid format is shown. -
Other incorrect
assignTaskcommands to try:assignTask 2000 1(this should be an incorrect task index specified)
assignTask -1 2 3(this is an incorrect format as indexes should be positive).
G.10. Set timetable to person
-
Test case:
setTimetable 1 n/https://nusmods.com/timetable/sem-1/share?CS2100=LAB:05,TUT:02,LEC:1&CS2101=&CS2103T=LEC:G13&CS2105=TUT:03,LEC:1&CS3241=TUT:05,LEC:1&CS3243=TUT:01,LEC:1&GEQ1000=TUT:D27
Expected: Data is fetch from the internet and added successfully. Scroll down on the result box to view visualization of timetable set. -
Test case:
setTimetable 1 n/https://nusmods.com/timetable/sem-1/share?CS2100=LAB:05,TUT:02,LEC:1&CS2101=&CS2103T=LEC:G13&CS2105=TUT:03,LEC:1&CS3241=TUT:05,LEC:1&CS3243=TUT:01,LEC:1&GEQ1000=TUT:D1
Expected: Error message should show due to invalid URL. System should pinpoint which module is invalid on the URL
G.11. Generate timetable
Assuming timetable is added as above, with person at index 1 in the checked out project
-
Test case:
generate d/2 r/MONDAY 0800 MONDAY 1000
Expected: Time slots generated successfully. Should see visualization on result panel. -
Test case:
generate d/2 r/MONDAY 0900 MONDAY 1100
Expected: Unable to generate any time slots. -
Other test cases to try out
-
Other timetables added to other members in the same project, and use generate command.
-
G.12. Saving data
-
Dealing with missing/corrupted data files
-
{explain how to simulate a missing/corrupted file and the expected behavior}
-
{ more test cases … }